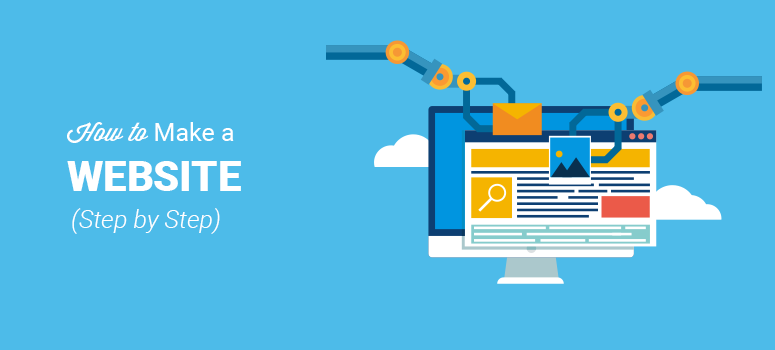
Are you looking to create a website to call your very own? Building a business website or a personal website used to be quite challenging in the past, especially if you weren’t a tech-savvy person. The good news is, with all the different options available on the internet today, starting a website has become extremely easy even for non-tech savvy users. Hallelujah!
Basically, if you know how to read, point and click with your mouse, then you can create a website in less than 60 minutes.
By creating a website, you can expand your reach to a wider audience and connect with like-minded people around the globe. With the right strategies in place, your website can also help you build a steady stream of online income.
In this article, we’ll show you how to start a website step by step with no technical knowledge needed.
For your convenience, we have organized our ultimate guide to creating a website into 10 different chapters:
Table of Contents
- Chapter 1: Why Start a Website?
- Chapter 2: Types of Websites
- Chapter 3: Choosing a Website Builder
- Chapter 4: Set Up Your Website with WordPress – The Technical Guide
- 4.1. Choosing a Platform – Self Hosted WordPress
- 4.2. Purchase a Domain Name and a Hosting Account
- 4.3. Install WordPress on Your Web Host
- 4.4. Change Your WordPress Theme
- 4.5. Create Your First Page
- 4.6. Setup a Static Homepage
- 4.7. Add a Navigation Menu
- 4.8. Add and Customize Your Widgets
- 4.9. Customize WordPress with Plugins
- Chapter 5: Configuring Your Website Settings
- Chapter 6: Essential WordPress Plugins & Tutorials (Basic)
- Chapter 7: Add Enhanced Features to Your Website (Advanced)
- Chapter 8: Promote and Grow Your Website
- Chapter 9: Before-Launch Checklist
- Chapter 10: Useful Resources and FAQs
Chapter 1: Why Start a Website?

With thousands of websites being created every day, you might be wondering, why start a website? There are so many out there already, how could you compete? But, it’s important to remember, even if your website isn’t the most popular one out there, it can still have big benefits for you.
Some benefits of starting your own website include:
- Connect with New People – A website of your own can help you connect with other like-minded people from all over the world.
- Share Your Passion – If you’re passionate about something, you can create a website to share that passion with others.
- Help Others – Want to share your expertise to help others? A website can help you do that.
- Get a New Job – Many employers are looking for candidates online. A personal, professional website can showcase your previous work and help you land a new job.
- Make Extra Money – With ads, affiliate marketing, or selling products online, you can build a website to make yourself some extra money on the side.
- Promote Your Business – If you have an existing business, you can start a website to promote your business and get new customers online.
Plus, these days, starting a website is so easy. So, there’s nothing stopping you from creating your own website, whether it’s for business, or for fun.
↑ Go back to Table of Contents
Chapter 2: Types of Websites
Before you make a website, you need to decide what type of website you should make. The type of website you want to make is an important step in figuring out how your website should look and what you need on your website.
There are a number of different types of websites. We’ll go over a few of them below to help you decide what type of website you want to make.
Online Store
An online store, otherwise known as an eCommerce website, is where people can purchase products directly from your site. You’ve probably visited a number of eCommerce websites before, most big brands have them such as Walmart, Amazon, Best Buy, and so on.
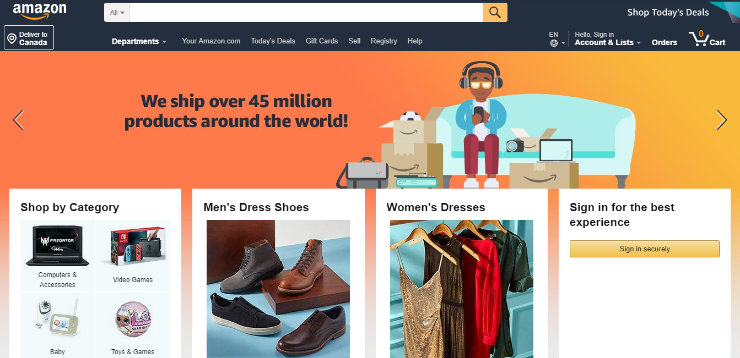
You can visit these websites, purchase a product online, and have it shipped to you. But online stores aren’t just for big brands, smaller companies can have them too.
On an eCommerce website, you’ll need to list the products you have for sale, that includes an image, product description, and price. You also need a shopping cart and a checkout page where visitors can enter in their payment information to make a purchase.
So, if you plan to sell products on your website, you’ll want to create an online store.
Blog
A blog is an informational website with regularly updated posts/articles written in an informal, conversational style presented in reverse chronological order (newest blog posts first). When blogs were first introduced, people mainly used them as a type of online diary where they would share what they ate for breakfast, what they did that day, shared their thoughts, and so on.
But today, blogs are much more than that. Blogs aren’t just for fun anymore, you can actually make money from a blog by adding ads and affiliate links. Plus, people can visit blog websites not just to read about someone’s life, but to learn about a wide variety of topics. Some popular blogging niches include:
- Lifestyle
- Tech
- Entrepreneurship
- Food/Recipes
- Parenting
- Health/Fitness
- Travel
- Finances/Budgeting
Some popular examples of blogs include our own, IsItWP, as well as WPBeginner, Pinch of Yum, TechCrunch, and Huffington Post.
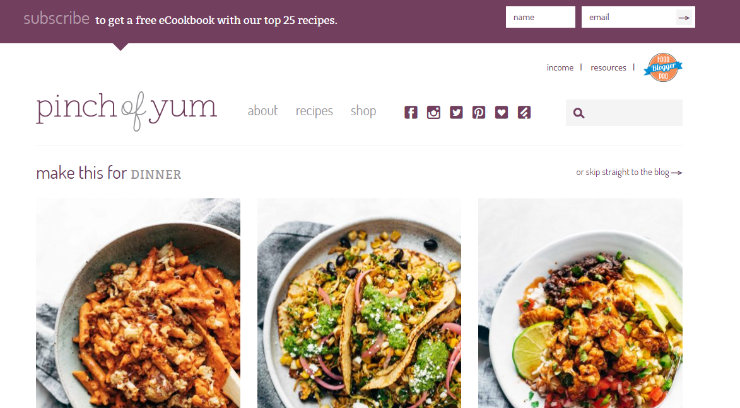
If you want to share your knowledge on a particular topic, you should choose to start a blog website.
For more detailed information, check out our post on what is a blog and the differences between a blog and a website.
Forums
A forum website is an online discussion site where people can hold conversations in the form of posted messages. This is different from a live chat website because forums are almost never live and the messages can be read at any time by anyone on the website.
A forum website, also known as a message board, is an opportunity for like-minded people to come together to discuss a wide variety of topics. Forums are usually organized and arranged into different topics so that users can easily find what they’re looking for.
Some popular forum websites include Quora and Reddit.
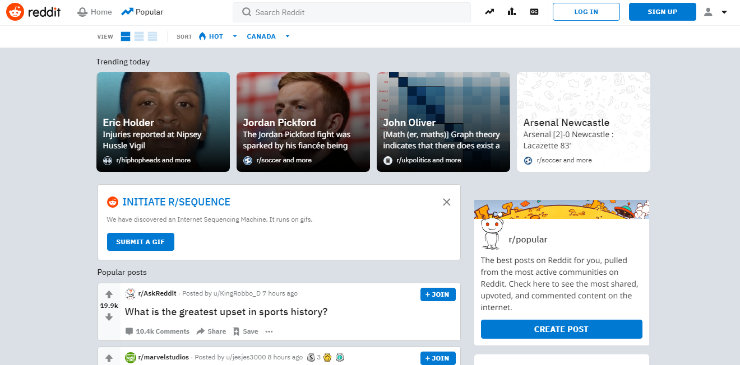
If you want to create an online community for users to discuss a topic or a variety of topics, consider creating a forum website.
Niche Social Network
We’ve all heard of social networking sites like Facebook and Twitter, which are platforms that boast billions of users. But a niche social network site targets only a particular segment of the general population.
On a niche social network, users can form connections with others that are similar to themselves or interested in the same subjects. For instance, you could create a niche social network for dog owners or for professional musicians.
Some popular niche social networks include Classmates, Last.fm, and Meetup.
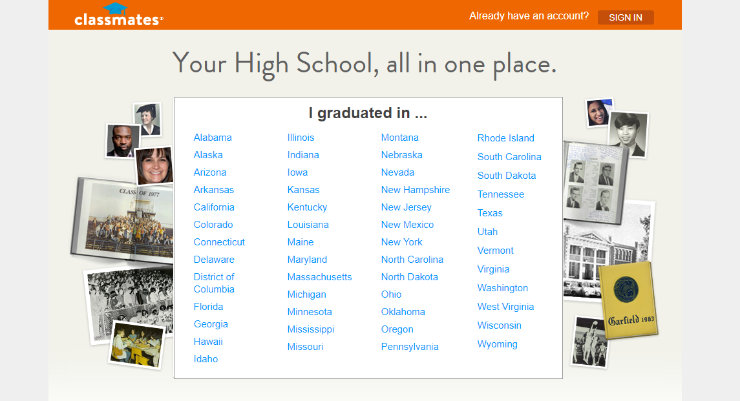
Want to create a tight-knight community that allows like-minded people to connect with each other? Start a niche social network site.
Membership Site
A membership site is a gated website where only the people who have subscribed can access the content behind the gate. The “gate” is simply a barrier that you put on the front of your website, where users have to log in to get access to your exclusive content, special offers, or to interact with the community. A membership site can be paid, free, or a bit of both.
You can easily turn any website into a membership site using a WordPress plugin like MemberPress.
Some popular membership sites include Wishlist Insider, Quiet Speculation, and Authority by CopyBlogger.
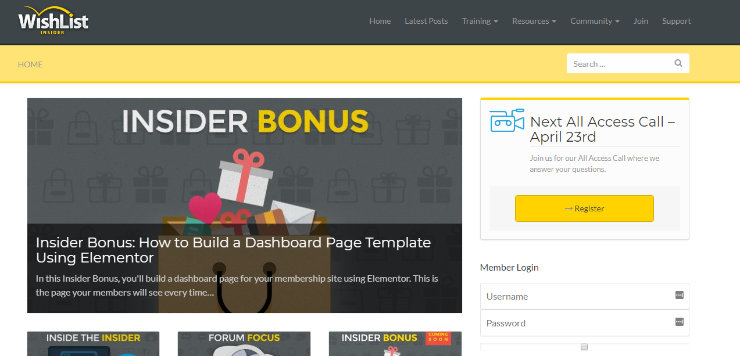
If you want to create a website with a VIP feel, consider creating a membership site.
Static Business Site
Another popular type of website is a static business site. A static business site is an unchanging, rarely updated website that represents and promotes a specific business. This type of website exists so that people can discover your business online and preview what you have to offer.
A static business site may include the address of your business, your phone number, a contact page, and an overview of what your business does. They also typically include an About page so your potential customers can get to know you and your credentials, a list of the services you offer, business photos, and reviews or testimonials.
Some examples of static business sites include Awesome Motive and small business websites like New Eco Landscapes.
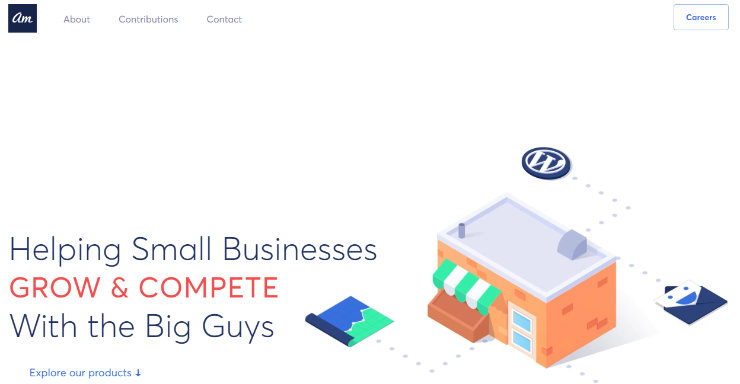
So, if you want to create an online presence for your small business and don’t have products to sell online, choose a static business site.
Hopefully, you’ve now decided what type of website you should make. The next step is to start building it! But first, you’ve got to choose the right website builder.
↑ Go back to Table of Contents
« Previous: Chapter 1 – Why Start a Website?
Chapter 3: Choosing a Website Builder
Building a website used to be difficult. If you wanted your own website, you would have to start building it from scratch, which requires an expert level of coding skills. Or you would have to hire a web designer to build it for you, which could be quite expensive. Luckily, that’s not the case anymore.
There are a number of website builders on the market that allow you to easily build a website in no time. But not all website builders are created equally. And with so many to choose from, how do you know which website builder is best for you?
In the next section, we’ll go over some of the best website builders. We’ll discuss their features, ease of use, price, and more, to help you decide which website builder is the best option for building your website.
3.1. Best Website Builders Showdown
The following website builders are all beginner-friendly, this means with any of these options, you can make a website in a matter of hours. We’ll go over each one to help you decide which website builder is best for your needs.

Wix is drag and drop website builder that allows you to create any type of website easily. You can design your own website starting with a blank slate or you can choose from over 500 designer-made templates that will give your website a professional look in an instant. You can also add video backgrounds, animations, and more, easily.
Pros:
- Free – You can get started with Wix for free. Their free plan allows you to create a simple drag and drop website with limited features.
- Responsive Design – Any website you create with Wix will be optimized for mobile, tablets, and desktops. This means no matter what device your website visitors are using, your website will adapt accordingly.
- Advanced Features – With Wix you can easily integrate advanced features, such as adding an eCommerce storefront. Wix also provides SEO tools and guides to help optimize your site for organic traffic.
Cons:
- Wix-Branded Ads – Wix displays branded ads on your website with the free plan, you need to upgrade to a premium plan to remove ads.
- Limited Customization – Customization is limited with Wix. You have to upgrade to a premium plan to get access to more features, and even then it’s still limited compared to other website builders. For instance, if you want to accept online payments on your website, you need to upgrade to a business plan starting at $20 per month.
- No Export – Wix offers no way to export your website data. So, if you want to move your website to another platform in the future, there’s no easy way to do so.
Price:
You can build a simple website for free with Wix. But to get access to more powerful features and remove Wix-branded ads, you have to upgrade to a paid website plan. These plans range from $5/month – $29/month. As we mentioned earlier, if you want to start an eCommerce website with Wix, you’ll need to upgrade to a Business & eCommerce plan, ranging from $20/month – $35/month.
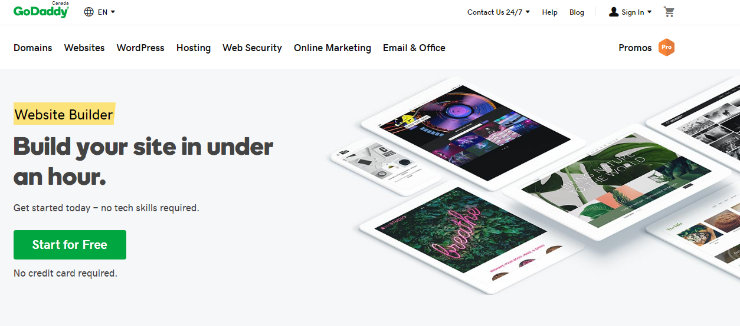
GoDaddy is a well-known domain registrar and hosting service provider, but they also offer a simple drag and drop website builder. They offer a number of website builder templates to get you started. Plus, those templates are easily customizable using their mix-and-match sections.
Pros:
- Marketing Tools – GoDaddy Website Builders comes with a number of marketing tools including SEO and email marketing to boost your online presence.
- Website Type Options – This website builder lets you create a number of different website types. You can easily add a blog or eCommerce storefront to your site.
- Mobile-Friendly – All websites created on GoDaddy Website Builder are mobile-friendly.
Cons:
- Limited Customization – This website builder offers fewer design options and less features for your site than other options.
Price:
There is no free plan offered with this website builder. You can get started with GoDaddy Website Builder for only $5.99/month with their Personal Plan. If you want to accept online payments or donations with PayPal on your website though, you’ll need to upgrade to the Business plan for $9.99/month.
Want to make an eCommerce site with GoDaddy Website Builder? Then you’ll need to choose the most expensive plan, Online Store, which will cost you $29.99/month.
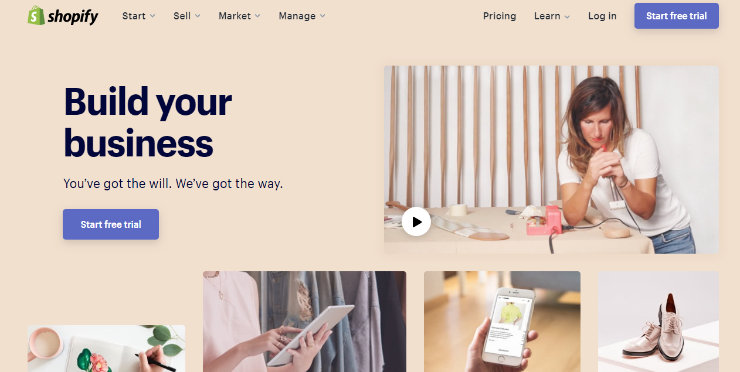
Shopify is a popular website builder geared towards eCommerce websites. This web-based website builder lets you make an online store in no time, without having to deal with any code. They offer a ton of free and paid, customizable themes to give your online store a professional look in an instant.
Pros:
- Online Payments – You can accept payments on Shopify without any third-party accounts. Plus, they seamless integration with over 100 third-party payment gateways.
- Advanced Marketing Tools – Shopify offers advanced marketing tools such as SEO tools and built-in blogs. In addition, they provide marketing dashboard reports so you can keep an eye on the performance of your online store.
- Mobile-Friendly – Your online store will look great no matter what device users are viewing your site on.
Cons:
- Transaction Fees – If you use an external payment gateway, you’ll be charged a hefty transaction fee, ranging from 0.5 to 2%.
- Expensive Apps – Apps for social media integration, live chat, flash-sales, and more have to be purchased separately. This can make customizing your online store very expensive.
Price:
You can get started with Shopify for $29/month with the Basic plan, this includes a 3% transaction fee. You can upgrade to the second highest plan, $79/month, to reduce the transaction fee to 1%. If you want to reduce the transaction fee to 0.5% and get access to all of the advanced features you need to run your online store, you’ll need to upgrade to the most expensive plan which costs $299/month.

Squarespace is another popular website builder that comes with everything you need to build a personal or business website. They offer a range of stunning templates designed for a variety of industries and niches to transform your website in a second. Plus, each template comes with a number of customizable features.
Also, check out our step by step guide on switching from Squarespace to WordPress.
Pros:
- Bandwidth & Storage – With any of their plans, you get unlimited bandwidth and unlimited storage.
- No Transaction Fees – You won’t get charged transaction fees for eCommerce transactions with their eCommerce basic or advanced plans.
Cons:
- No Free Plan – Squarespace doesn’t offer any free plan, unlike other website builders. Plus, their starting plan is pricier than other website builders as well.
- No Third-Party Apps – Squarespace doesn’t allow any third-party apps or extensions.
Price:
The personal plan for Squarespace costs $12/month, this includes the ability to build unlimited pages. If you want to add an eCommerce storefront to your website, you’ll need to upgrade to their business plan which costs $18/month with a 3% transaction fee. If you want to remove transaction fees, you’ll need to upgrade to their basic online store plan for $26/month.
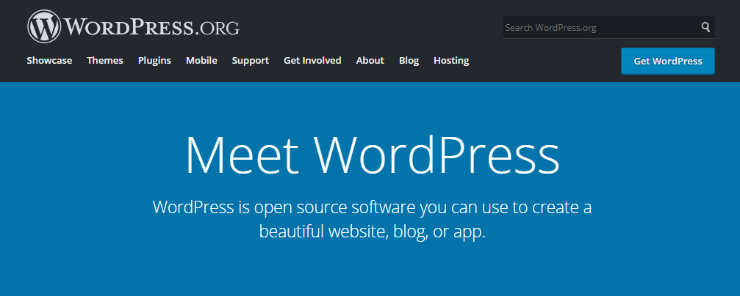
WordPress.org is the most popular website builder of all time, and it actually powers over 30% of all the websites on the web. With WordPress, also known as self-hosted WordPress, you can easily build any type of website you want including a blog, small business or enterprise business website, eCommerce store, portfolio, and more.
Pros:
- Endless Customization – With WordPress you get access to thousands of free and paid themes to transform the look of your website. Plus, you can change your theme easily, any time you want. You also get access to thousands of free and paid plugins to customize and add extra power to your website. Creating a fully-customized website is easy and affordable with WordPress.
- Control – When you use WordPress, you have complete control of your website.
Cons:
- Slight Learning Curve – Learning how to use WordPress takes a bit of time. But, there are plugins you can use to make the process easier like drag and drop page builders.
- Can’t Create Free Website – You can’t create a free website with WordPress.org, you’ll need to pay for hosting and a domain name.
Price:
While the WordPress software is free to use, you still need to spend some money to make a website. You’ll need to purchase a domain name and web hosting, but don’t worry, these can be very affordable depending on which providers you choose. Plus, we’ll go over how to purchase a domain name and web hosting further on in this guide.
3.2. Why Do We Recommend WordPress.org?
WordPress is by far the best choice for building a website. It’s the most popular website builder for a reason. You can use WordPress to build any type of website you want, whether it’s a business website, blog, membership site, forum site, eCommerce site, and so on. Plus, with WordPress, you get instant access to any feature you need to make your website successful.
Also, check out our article on best WordPress books for more resources on WordPress.
Let’s quickly go over the reasons why WordPress.org is the best website builder:
- Free – WordPress is free to use. You need to purchase a domain name and web hosting but even with those costs, WordPress is still one of the most affordable website builders out there.
- Popular – Powering over 30% of all websites online, WordPress is the most used website builder by far. There’s safety in numbers.
- Community – There’s a huge WordPress community online. Anytime you have an issue or need an answer to a question, you can find tons of articles, tutorials, and discussions online to help you out.
- Themes & Plugins – With other website builders, you need to pay extra to get access to plugins that add more power and customization to your website. But with WordPress, you get access to thousands of free plugins instantly. Not only that but they also offer thousands of free themes as well.
- Easy to Use – While WordPress takes some getting used to, it’s actually very simple and easy to use. Installing WordPress itself takes no time at all either, many hosting providers provide 1-click WordPress installation.
So, overall, we recommend using WordPress to build your website. Even complete beginners can make a fully customized website with WordPress in no time.
Don’t get WordPress.org confused with WordPress.com though. We recommend building your website with WordPress.org because you get complete control over your website, unlimited customization options, and it’s less expensive too. For more details, check out our article comparing WordPress.com vs. WordPress.org.
↑ Go back to Table of Contents
« Previous: Chapter 2 – Types of Websites
Chapter 4: Set Up Your Website with WordPress – The Technical Guide

WordPress is the most popular website builder platform available on the internet. It powers over 30% of all websites today.
WordPress makes it incredibly simple to build a website from scratch. You can easily customize the appearance and features of your site by installing the right theme and plugins (apps) respectively.
The best part is, you don’t need to know any code or be tech savvy. We’ll help you get your WordPress website up and running in less than an hour. All you have to do is follow the step by step guide below.
4.1. Choosing a Platform – Self Hosted WordPress
Because there are tons of different website builders to choose from, it’s easy to get overwhelmed. Even though many website builders are free to use, we always recommend starting a website on a self-hosted WordPress platform.
With a free website builder, you can’t set up a custom domain name. For example, you won’t be able to get a custom domain like:
www.mycoolwebsite.com
Instead, you’d be stuck with something like:
www.freewebsitebuilder.com/mycoolwebsite.com.
Which is not as professional and it’s more difficult for your visitors to remember. A free website builder also displays irrelevant ads, which makes your website look unprofessional as well and can annoy your visitors. If you want to set up a custom domain name and remove their ads, then almost every website builder requires you to subscribe to a premium plan which is quite expensive.
Another disadvantage is that the interface of most website builders come bundled with a lot of bloated options that you’ll probably never need. This makes creating a website a tedious task for novice users.
On the other hand, a self-hosted WordPress platform gives you full control over your site. The interface is tidy, and you can easily expand the features of your site by simply installing the plugins you need. Plus, WordPress offers thousands of free plugins, this allows you to make your site more powerful at no cost.
Additionally, you can find thousands of free WordPress themes from the official theme repository that enable you easily customize the appearance of your site the way you want.
4.2. Purchase a Domain Name and a Hosting Account
To start a website on self-hosted WordPress.org, you’ll have to own a domain name and a web hosting account.
Domain name: Your domain name is your website’s address (URL) on the internet, like Google.com or IsItWP.com. It’s what your customers type in their browsers to access your website. A domain name usually costs around $14.99 per year.
Web hosting: Your web hosting account is where your website’s content and files are stored online. Think of it as your website’s physical house. When a visitor tries to access your website by typing in your web address (domain name), they’ll be directed to the website you’ve set up in your web hosting server. Web hosting typically costs $7.99 per month.
The combined cost of a domain name and hosting can be quite expensive, especially if you’re just starting out.
That’s why we’ve worked out a deal with Bluehost to offer our users a FREE domain name and over 60% off on web hosting. It’s a great deal to get started.
Click here to Claim this Exclusive Bluehost Offer »
Bluehost is one of the largest hosting companies in the world. They’ve been working with the WordPress community since 2005, and they’re an officially recommended hosting provider by WordPress themselves. Read our Bluehost review for more information.
Note: We believe in full transparency. If you purchase hosting using our referral link, then we will get a small commission at no additional cost to you. You’ll actually get a discount on hosting + a free domain name + free SSL. We can get a commission from just about any hosting company, but we recommend products that we truly believe will give value to our readers.
To start your WordPress website, head over to Bluehost’s website and click the Get Started Now button.

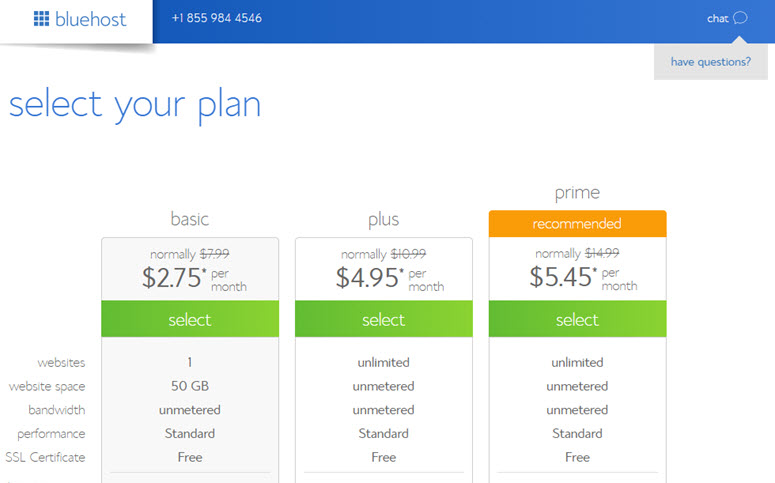
On the next page, you’ll be asked to choose a plan. Since you’re just getting started, you should choose the basic plan. It includes a free domain name and free SSL certificate. You can always upgrade later as your site grows.
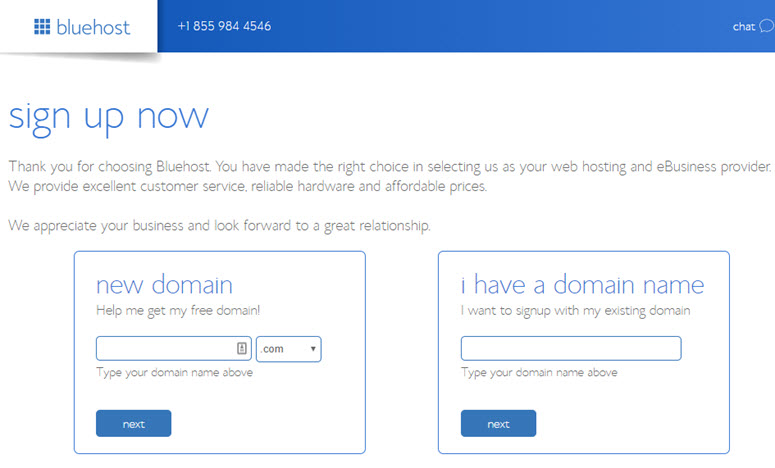
On the next screen, you will be asked to choose an existing domain you own or you can purchase a new domain for free. Go ahead and purchase a new one since it’s free.
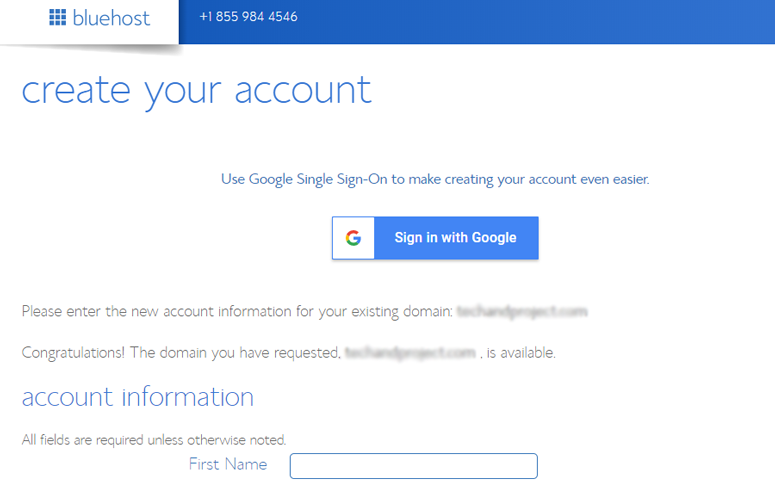
You’ll now be prompted to enter your account information. For easy registration, you can sign in with Google with just a couple of clicks.
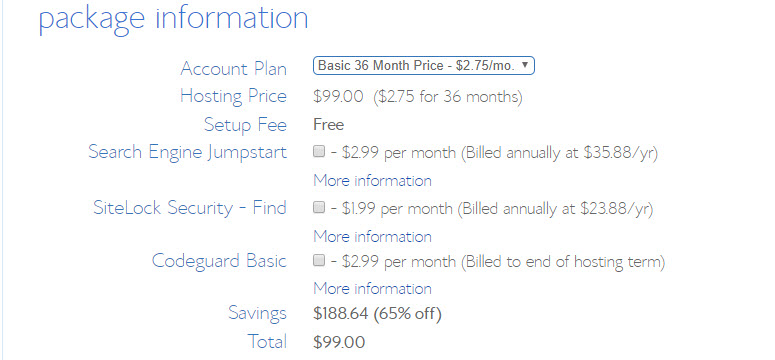
After entering your details, scroll down on the page until you find the package information box. You can select the basic plan for 12 months, 24 months or 36 months. You can also see that a few addons are preselected, adding up the total price. We recommend unchecking the addons because you won’t need these right away. You can always purchase them later if your needs change.
Choosing the 36 months plan will get you the best value for your money.
Once you’re done choosing your plans, scroll down the page further to enter your payment details. You have to agree to their Terms of Service and then, click Submit.
That’s it!
You’ve successfully subscribed to a hosting plan. You’ll be asked to create a password for your account.
Next, you’ll receive an email with details on how to log in to your web hosting control panel (cPanel) where you can manage everything from hosting files to emails and support.
4.3. Install WordPress on Your Web Host
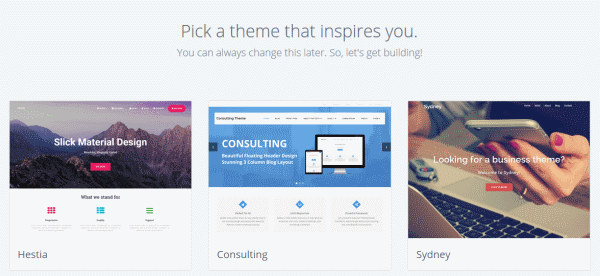
With Bluehost, you don’t have to go through a separate WordPress installation process because Bluehost now installs WordPress by default. All you have to do is choose your WordPress theme, specify the name and tagline for your website, and you’ll be ready to get started with WordPress.
After subscribing to your hosting plan, you’ll be prompted to choose a WordPress theme. You can just pick anything during this step because you can always change your theme later (we’ll show you how to do so in a later step of this tutorial). The most important part is to start building your site so any theme will do the job for now.
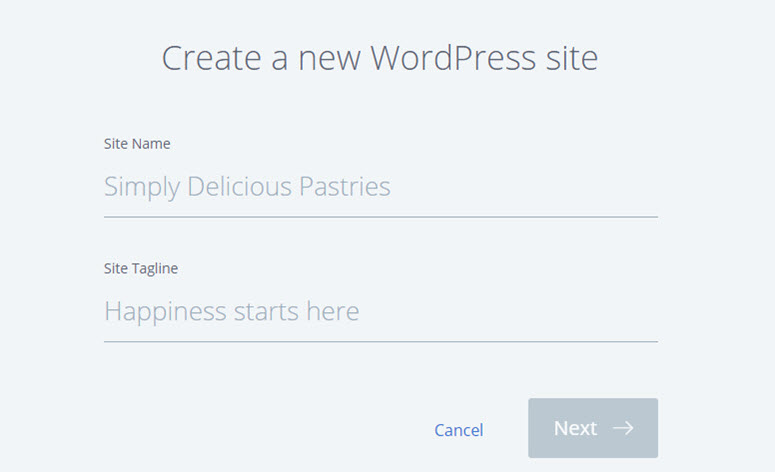
You’ll then be asked to choose the name and tagline for your website.
After specifying the details, click Next. Bluehost will now install WordPress for you and, once done, will show you a screen like this:
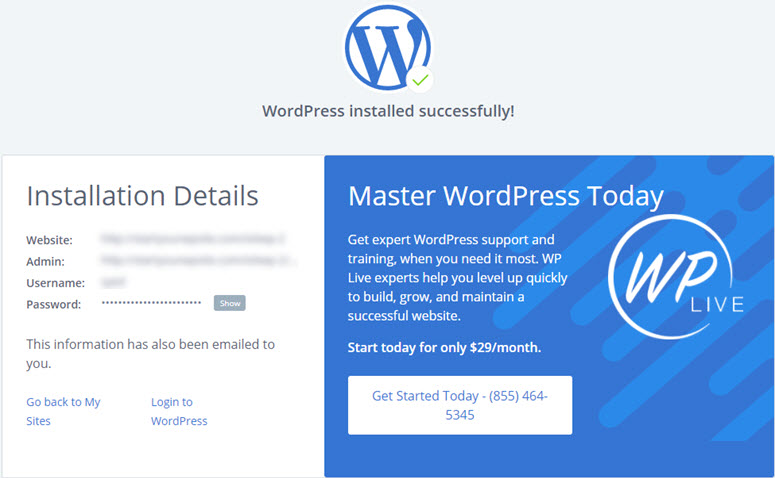
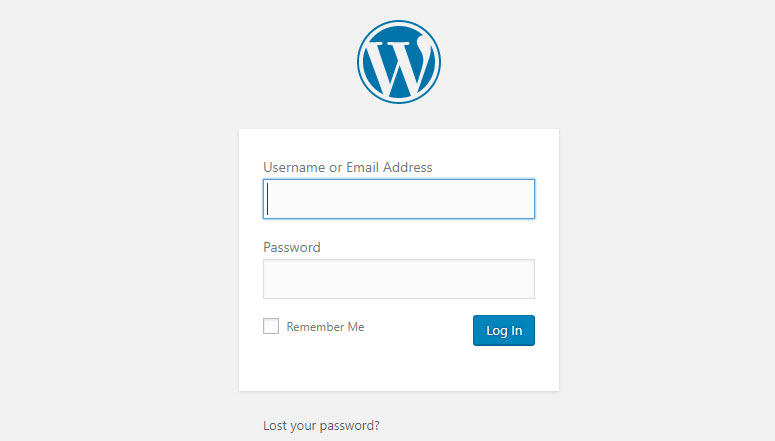
You can login to your site by appending wp-admin to your URL. Here’s what your WordPress login URL should look like:
http://example.com/wp-admin
You can now login to your WordPress website with the credentials sent to your email address.
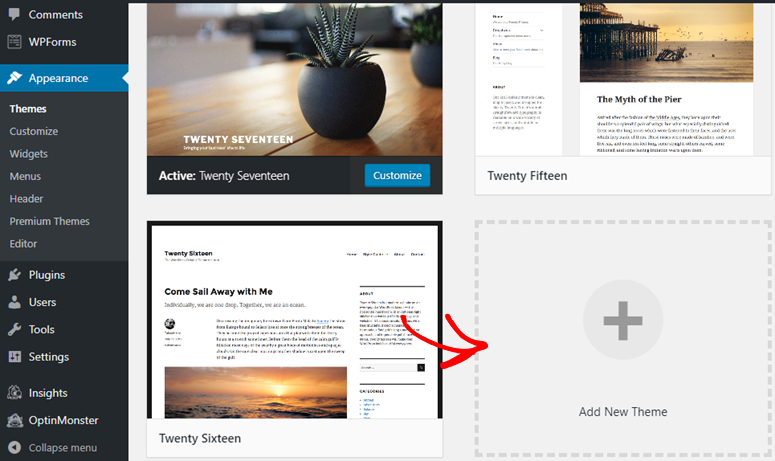
4.4. Change Your WordPress Theme
With WordPress, you can easily change the visual appearance of your website. All you have to do is to find the right WordPress theme and install it on your WordPress website.
The default WordPress theme is good, but if you want a different look and feel for your site, then you can find an alternative theme from the official theme directory and install it on your site. Finding the perfect theme will enable you to make the site truly yours, and give it that personal “you” feeling.
It’s highly recommended to take a look at our top WordPress themes list before you dive in and install a random theme.
If you choose a premium theme, then it has to be downloaded from the theme vendor’s site and uploaded to your WordPress.
If you decide to go with a free WordPress theme from the official theme repository, then you can install it directly from your WordPress dashboard without a manual download from your computer.
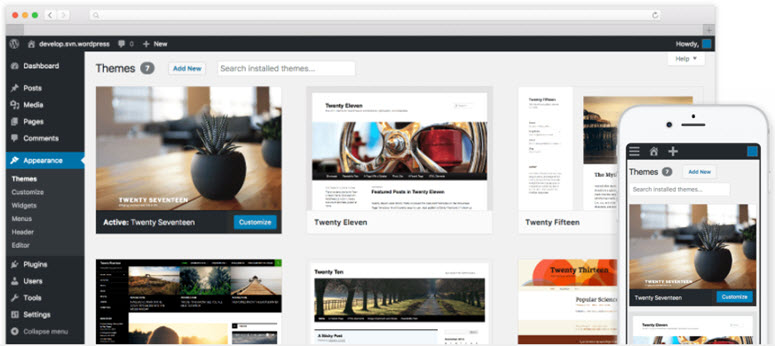
To install a free theme, navigate to Appearance » Themes in your WordPress dashboard. Then click the Add New Theme box.
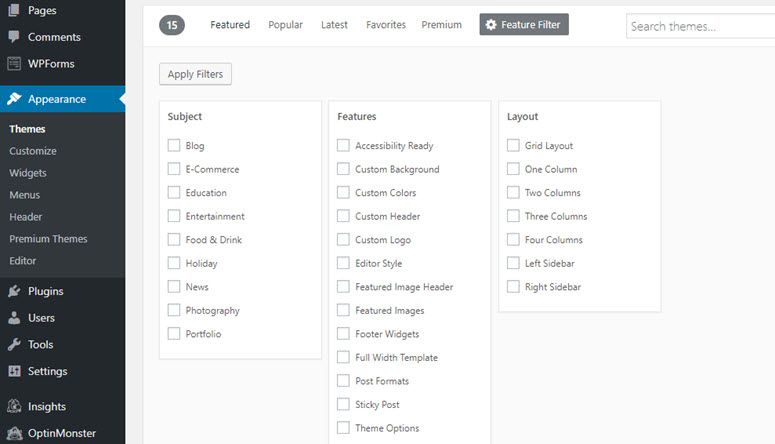
This will show you some featured themes in your dashboard. Before installing, you can even look at the preview and its details by clicking on the image.
You can also filter themes based on layouts, features, and your website niche by clicking on the Feature Filter button.
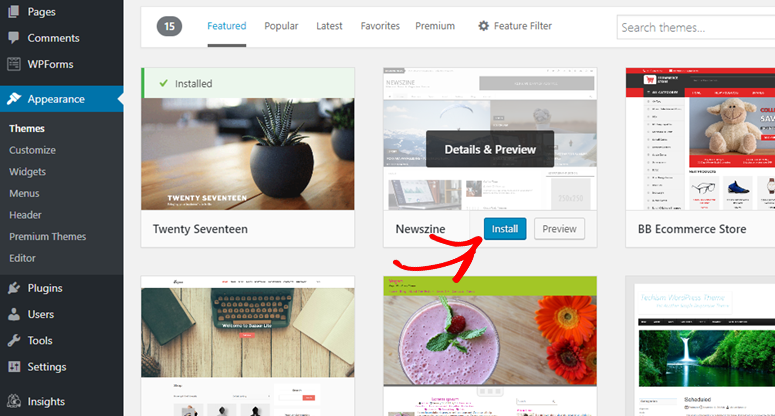
In the right hand corner, type the theme’s name in the search bar. Once you’ve found the perfect theme, hover over its image and then click the Install button. Next, click the Activate button to change your website’s appearance.
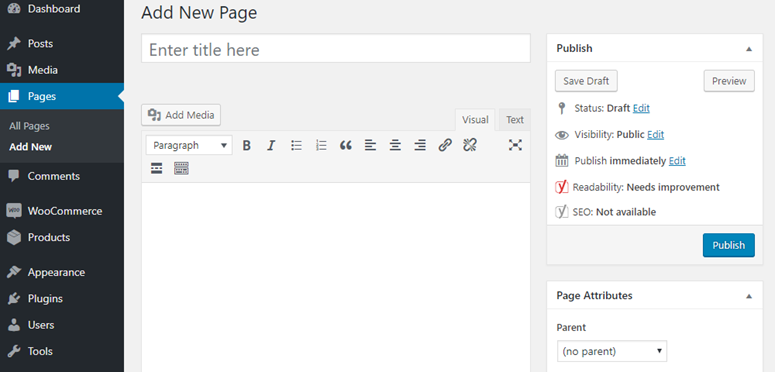
4.5. Create Your First Page
After changing your site’s appearance, it’s time to create a new page on your site.
In the left-hand menu of your WordPress dashboard, you can find two similar options that’s often confusing for beginners: Posts and Pages.
Choose Pages if you want to create standalone pages in your WordPress website such as an About Us page, Contact page, Terms of Service page, etc.
Choose Posts if you want to create a blog post that appears in reverse chronological order (newer ones first) on your WordPress website. Posts are also organized into categories and tags. You can read the difference between categories and tags for more information about this.
To create your first page, head over to your page editor by clicking on Pages » Add New. You will need to add a title for your page before you start writing content in the page editor. To upload images to your website, all you have to do is drag and drop your images to the text editor from your computer. Alternatively, you can use the Add Media button to upload your images and videos.
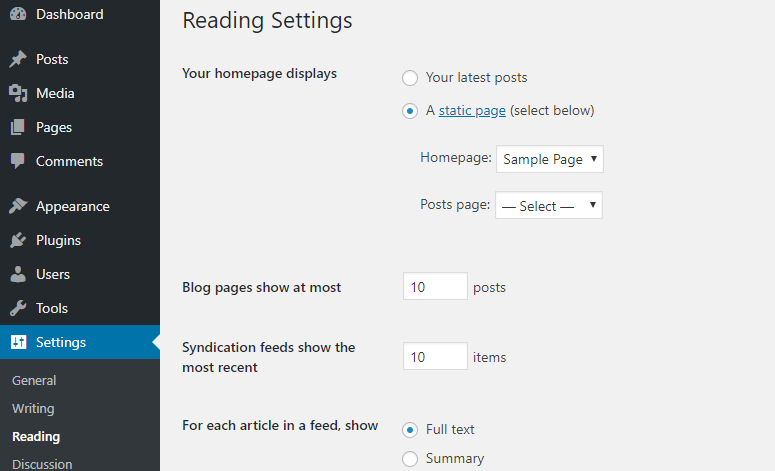
4.6. Setup a Static Homepage
By default, WordPress shows your blog’s latest posts as your homepage instead of a static page. If you want to set a custom page as your homepage, then simply follow the steps below.
After creating a page, go to Settings » Reading on your WordPress admin dashboard. In the Your Homepage displays option, you’ll need to choose A static page and select the page you want to display as your front page in the dropdown menu. Once you’re done, click the Save Changes button.
Your navigation menu sticks to the top of your website, so your visitors can easily find the most important pages and links, making it easy to explore your site.
To add a navigation menu, you need to go to Appearance » Menus in your WordPress admin. Specify a menu name in the Menu Name field (this comes in especially handy if your theme supports multiple navigation menus). Then, click Create Menu.
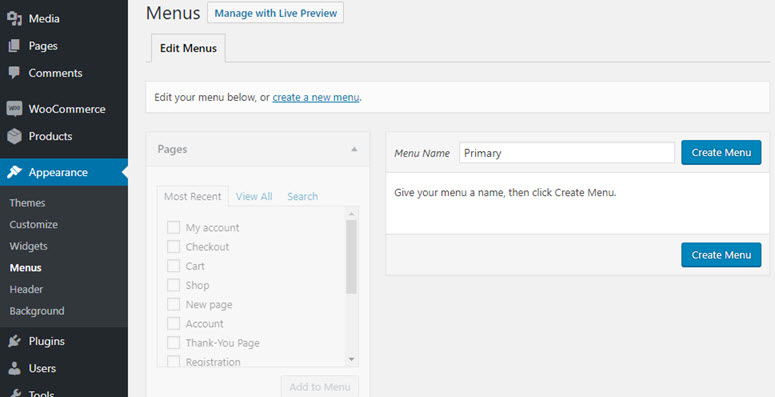
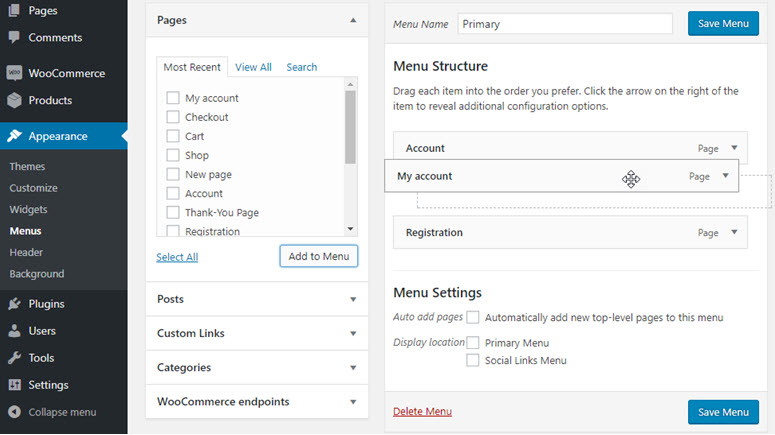
You can now choose from your existing pages, posts, custom links, and categories. After selecting what you feel deserves to be featured, click Add to Menu. With drag and drop, you can position the menu’s structure. Then, you’ll need to specify the display location and click Save Menu.
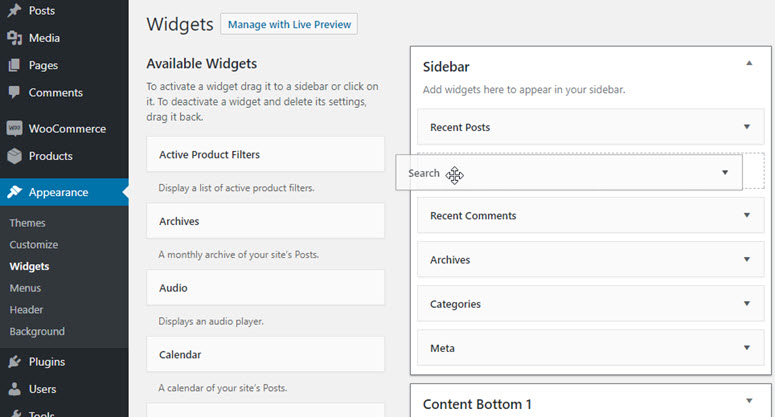
4.8. Add and Customize Your Widgets
On your WordPress website, you can easily add widgets in your sidebar and other widget-ready locations like your site footer, header, etc.
Adding a widget allows you to add customized / dynamic content. It allows you to add things like menus, calendars, contact forms, galleries, and other nifty items on your website’s sidebar or footer area.
You can add a widget by going to Appearance » Widgets and select from the available widgets. You simply drag and drop your preferred features to the widgetized area of your WordPress site.
4.9. Customize WordPress with Plugins
The beauty of WordPress is that you can easily enhance the capabilities of your site by simply installing the right plugins. Think of plugins as apps for your website (i.e contact form, gallery, etc).
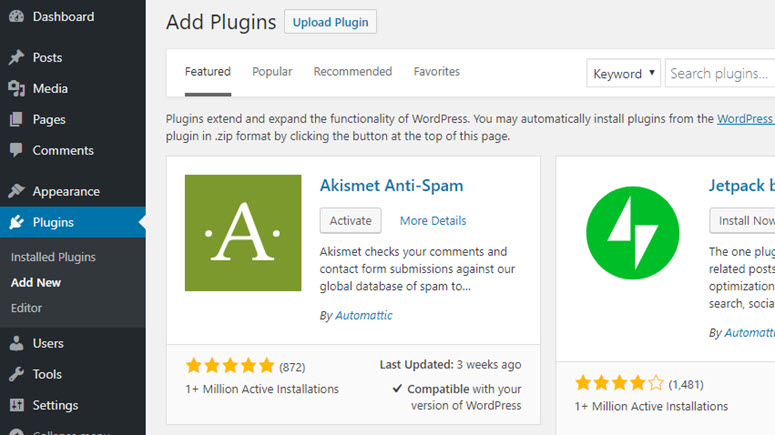
Just like WordPress themes, you can easily find and install free plugins from the WordPress plugins repository within your WordPress dashboard.
All you have to do is to visit Plugins » Add New. Use the search box in the right-hand corner to find a plugin, and click the Install Now button. Once it’s installed, click the Activate button to get it working.
↑ Go back to Table of Contents
« Previous: Chapter 3 – Choosing a Website Builder
Chapter 5: Configuring Your Website Settings
Next, you’ll want to configure your website settings. Configuring the basic WordPress settings is important to how your site functions. There are a few key website settings you should focus on, we’ll go over those below.
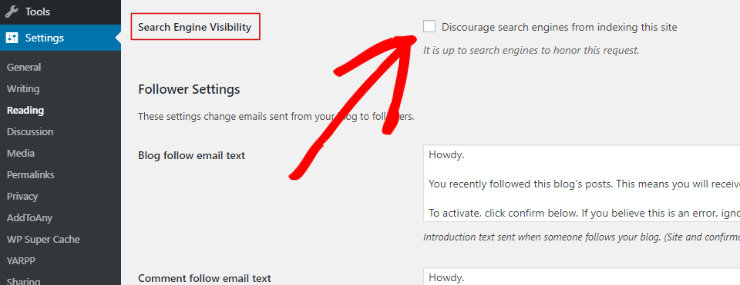
5.1. Make Your Site Visible to Google
First, you need to make sure your website is visible to Google. This allows your website to be ranked in search engine results, which will allow users to find you on the web easier.
In the WordPress dashboard, go to Settings, then to the Reading section. In the Search Engine Visibility section, make sure the box is unchecked.
5.2. Set the Permalink Structure
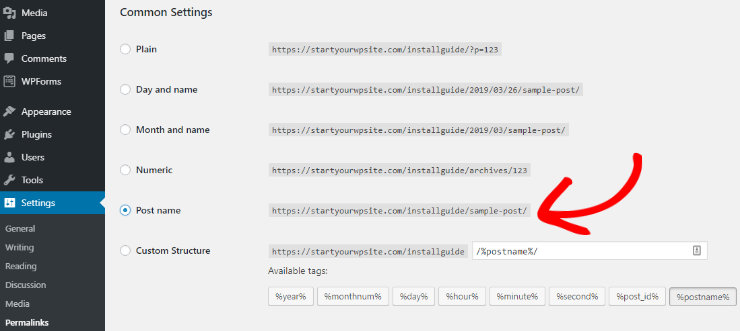
Next, you’ll want to set the permalink structure. A permalink is the web address used to link to your content. By default, WordPress sets the permalink structure, but it’s not the most optimized. Instead, you’ll want a permalink structure that will help search engines and your website visitors easily understand your content.
So, go to Settings, then to Permalinks. Under Common Settings, select the Post name option.
5.3. Comments and Notifications
If you’re starting a blog or blogging on your website, you’ll also want to configure the comment settings for your website.
Any blog should allow users to comment on posts, this increases engagement on your website, boosts the time users spend on the page, and encourages to visit your website again.
To configure the comments, go to Settings, then Discussion. Here you can choose whether you want to allow people to comment on new articles and allow link notifications from other blogs (pingbacks and trackbacks) on new articles.
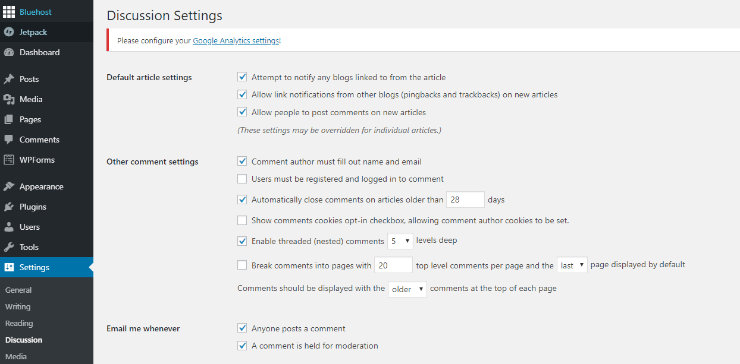
You can also decide whether you want commenters to have to fill out their name and email before commenting or be registered and logged in to comment. In addition, you can choose to receive an email notification anytime someone comments on your blog.
5.4. Update Your Timezone
You should also make sure your WordPress site is set to the correct timezone. Scheduled activities and plugins will go by the time your WordPress is set to.
So, if to make sure your WordPress website is set to your correct timezone, go to Settings and then to General.
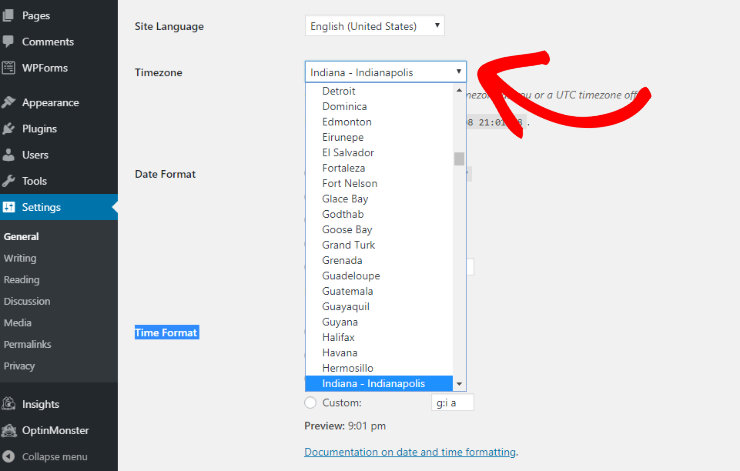
In the dropdown menu next the Timezone, choose a city in the same timezone as you or a UTC timezone offset.
↑ Go back to Table of Contents
« Previous: Chapter 4 – Creating a Website – Technical Guide (Step by Step)
Chapter 6: Essential WordPress Plugins & Tutorials (Basic)
No matter what type of website you want to create, you’ll need to add the same essential features (such as the ability to create a contact form, ability to easily add SEO tags, and so on).
With WordPress, you can easily add those features without hiring a developer or writing a single line of code. All you have to do is to find the right plugin and install it on your site.
We’ll explain…
- How to add a contact form to your website
- How to track your visitors using Google Analytics
- How to improve your website’s SEO
6.1. How to Add a Contact Form to Your Website
Regardless of your site’s niche, size, and purpose, adding a contact form is essential. When you have contact forms added, your visitors can easily reach out to you right from your website without having to log into their email account.
WPForms is the best contact form plugin for WordPress beginners. It lets you create contact forms with a drag and drop builder and allows you to publish the forms you create anywhere on your site with ease.
A few more benefits of using WPForms:
- Create any type of online forms hassle-free such as contact forms, donation forms, registration forms, signup forms, and more…
- All forms you create with WPForms will be 100% responsive, meaning they work on mobile, tablets, and desktop browsers.
- Seamlessly integrate your form with your favorite email marketing tools or third-party web apps.
- And more…
Read the complete WPForms review for more information.
To create a form on your blog, you’ll have to install WPForms by navigating to Plugins » Add New. Search for the WPForms plugin and, when it shows up, click Install Now, and then click Activate.

You’ll now be directed to the beautiful welcome page for WPForms. You can either click the Create Your First Form button or click WPForms » Add New to create your first form.

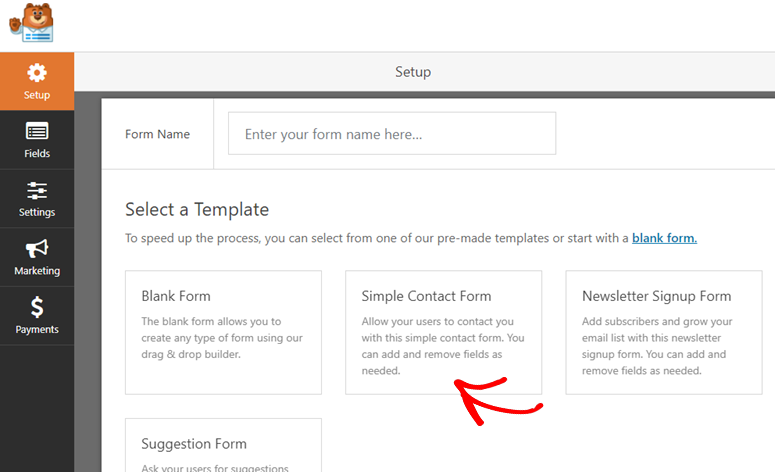
Next, you’ll be prompted to choose a template. You can select one of the premade templates or start with a blank form. If you want, you can give a custom name to your first contact form.
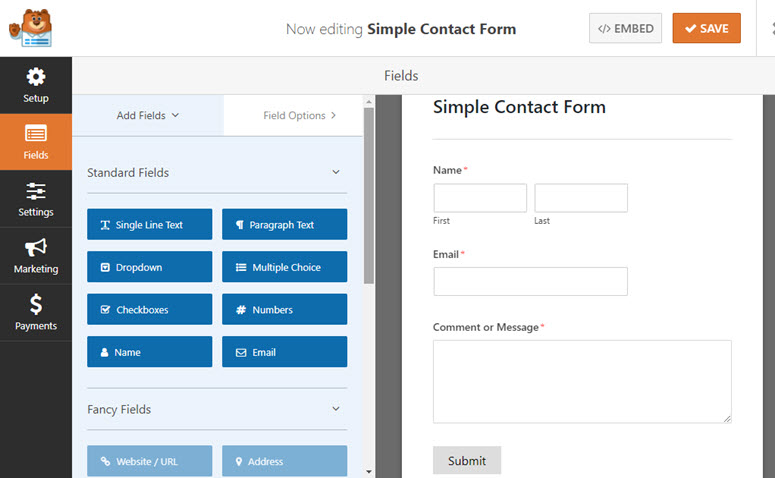
WPForms makes it easy to build a form with drag and drop. Click on the appropriate form fields in the left-hand panel to add them to your form. You can also re-arrange them or even remove any unnecessary fields with ease. After making the necessary changes click Save.
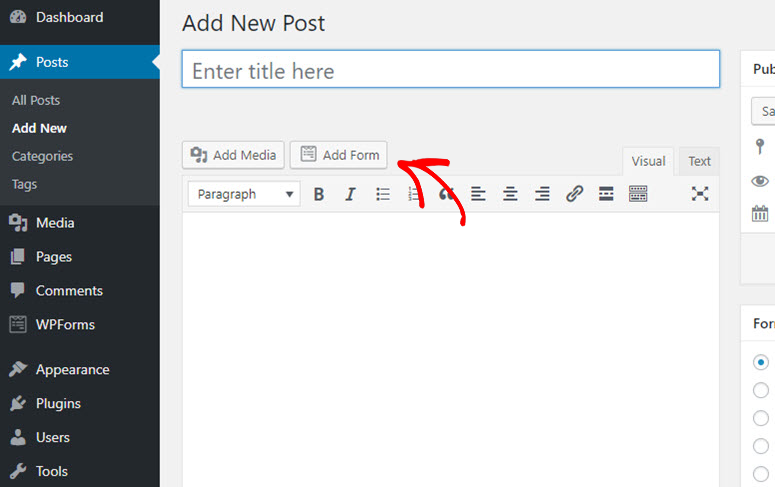
Go to your post or page editor and click the Add Form button above the text editor.
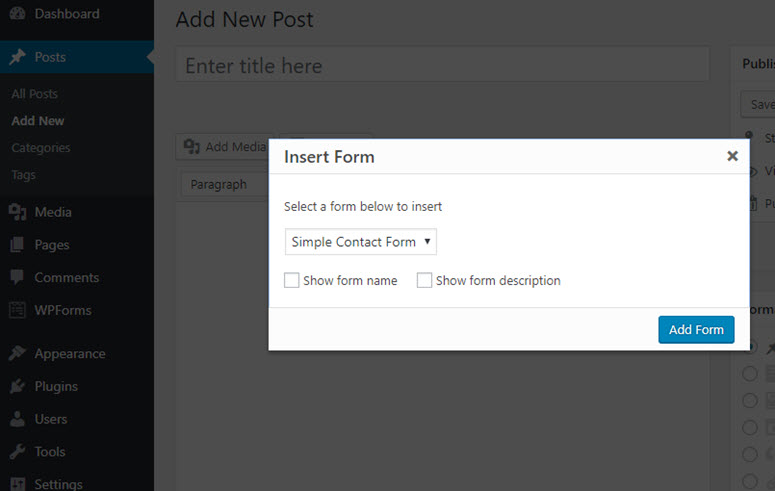
Select the correct form you want to publish, then click Add Form, and then click Publish.
That’s it! You’ve now successfully published a contact form.
Want to create a contact form the easy way? Get started with WPForms today.
Want to start with the free version instead? Try WPForms Lite.
6.2. How to Track Your Visitors Using Google Analytics
If you want to grow your website traffic, then you’ll first need to understand how people are finding your website and what they do when they get there.
The easiest way to track user interactions on your site is by using Google Analytics. Google Analytics is the best tracking solution for websites, and it’s completely free to use.
The MonsterInsights plugin makes it easy for you to setup Google Analytics on your WordPress website. Plus, it lets you make use of the full potential of Google Analytics tracking, like file downloads tracking, ads tracking, form submissions tracking, eCommerce transactions tracking, etc. without having to touch a single line of code.
Read the complete MonsterInsights review for more information.
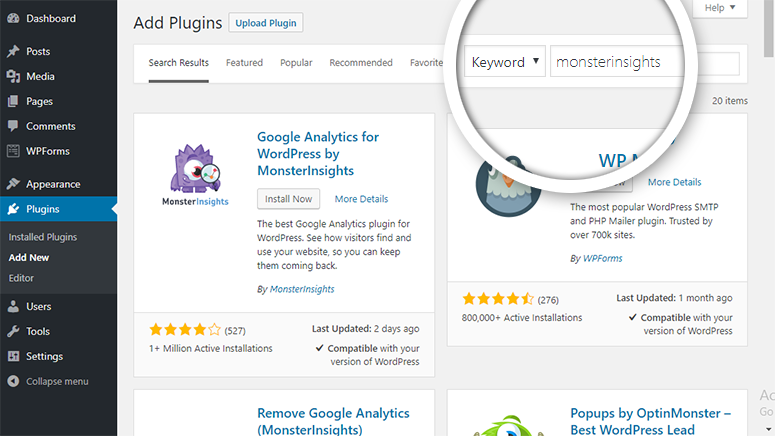
To set up Google Analytics on your site, head over to Plugins » Add New. Search for MonsterInsights and, when the plugin shows up, click Install Now and then, activate.
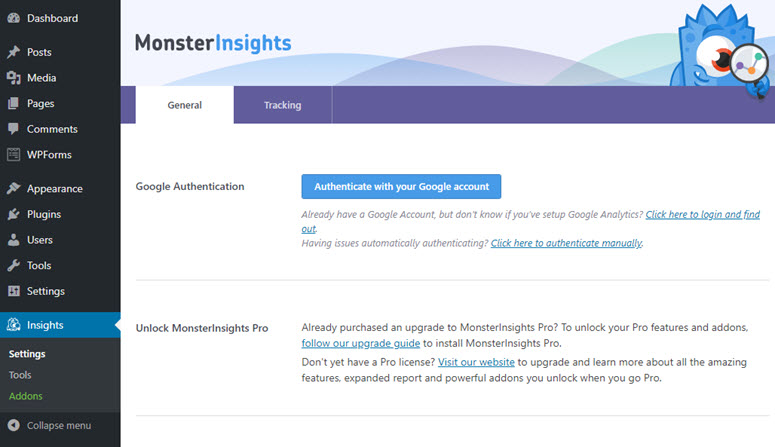
Head over to Insights » Settings to authenticate your site with Google Analytics. Click Authenticate with your Google account button.
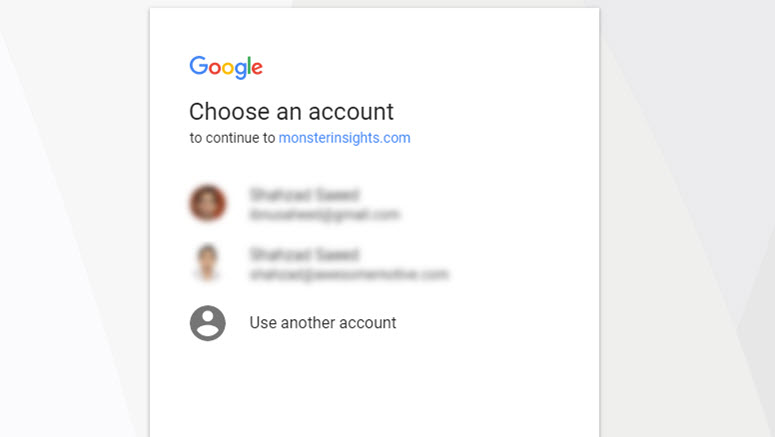
On the next screen, select your Google account.
Next, allow MonsterInsights to manage your account.

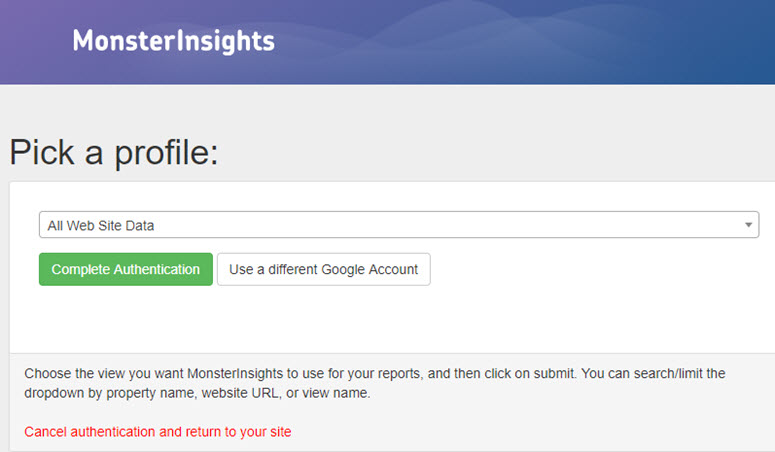
Finally, select the correct website profile for your site and click Complete Authentication.
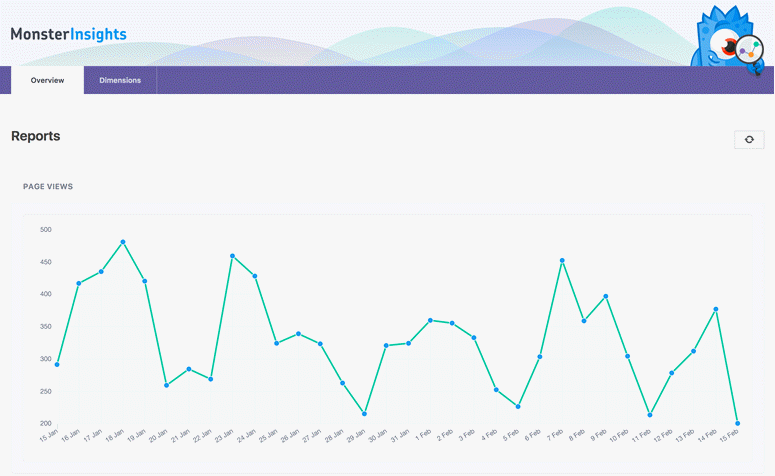
After authentication, you can easily discover how your website is doing by visiting Insights » Reports.
Get started with MonsterInsights today to easily set up Google Analytics on your site.
Want to start with the free version instead? Try MonsterInsights Lite.
6.3. How to Improve Your Website’s SEO
Want to attract a targeted audience to your website? The best way to attract targeted visitors is to drive more search engine traffic, also known as organic traffic, by improving your website’s SEO.
According to OptinMonster, SEO is the practice of increasing your website traffic by getting your web pages to rank higher in search engine results. Visitors who arrive at your site via search engines are called organic traffic.
SEO can get technical and complicated, but, thanks to free SEO plugins, it has gotten quite easy to improve your WordPress SEO, even for beginners.
While you can find tons of different SEO plugins out there, we use and recommend Yoast SEO. It’s the most popular SEO plugin for WordPress (for good reason!).
With Yoast SEO, you can easily add meta tags and titles to your WordPress blog posts and pages. It also forces you to choose a focus keyword for your blog posts and pages to ensure you’re using the keyword appropriately on that page.
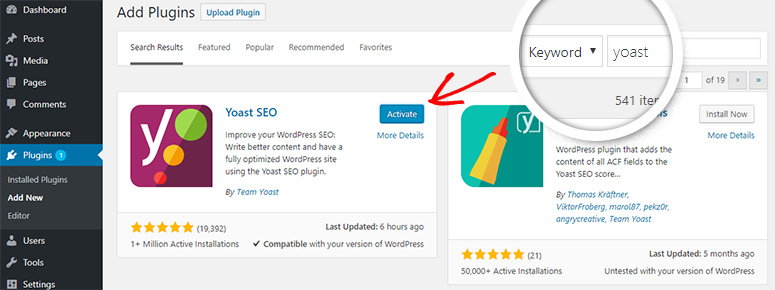
In your WordPress dashboard, go to Plugins » Add New. Search for Yoast in the search bar in the top right-hand corner. The Yoast SEO plugin will now have appeared on your page. Click Install, and then Activate.
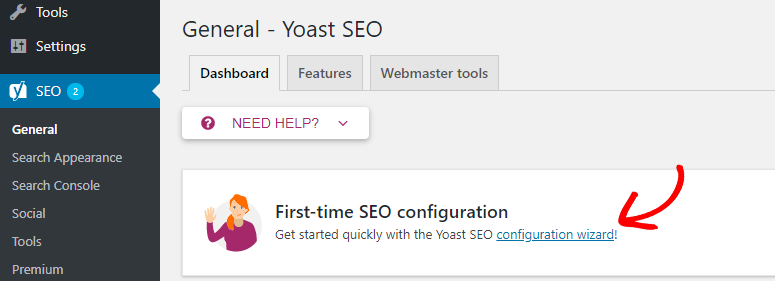
On your WordPress dashboard, you can now find the SEO menu in the left-hand taskbar. Simply click on it. If the plugin detects any SEO errors, you can fix them by following the suggestions provided.
Setting up Yoast SEO is simple when using the configuration wizard. Simply click on the configuration wizard to get started.
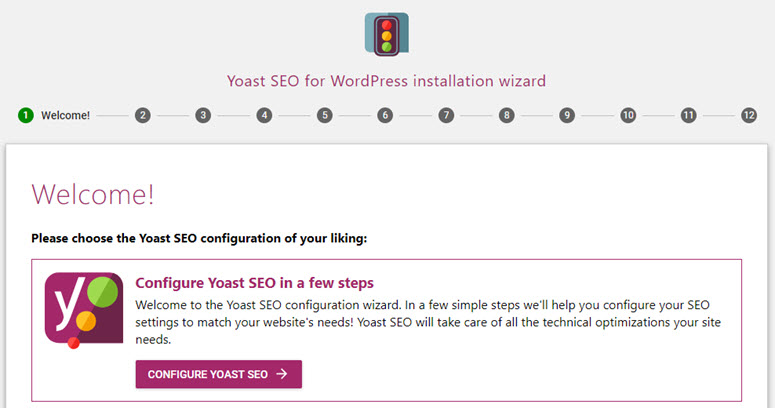
In the first step, you’ll be asked whether you want to configure Yoast SEO yourself or hire an expert to do it for you. Select CONFIGURE YOAST SEO to do it yourself.
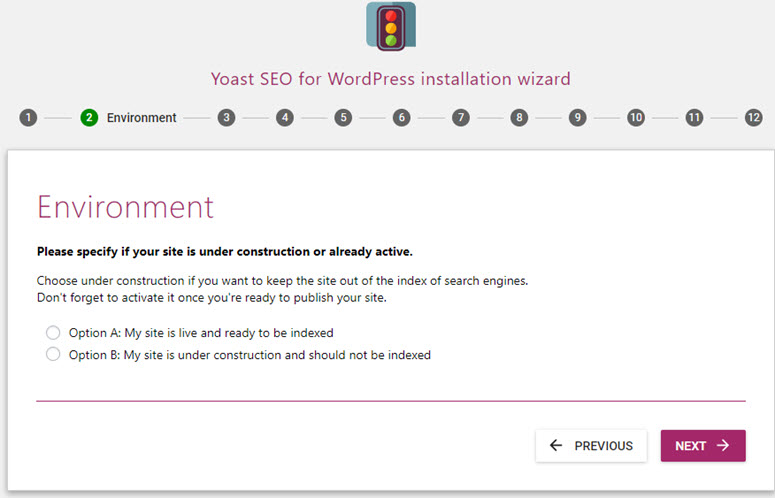
In the next step, you’ll be asked whether your site is ready to be indexed. You can choose option A. Then, click Next.
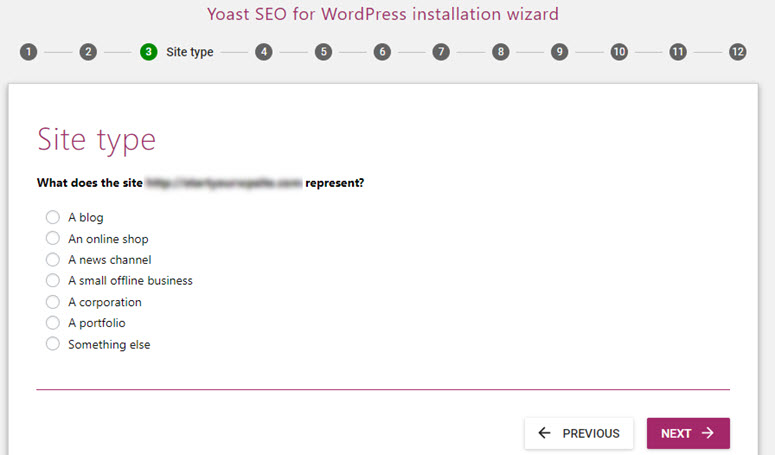
You can find a lot of different website types in the list. Be sure to choose the right type, and then, click Next.
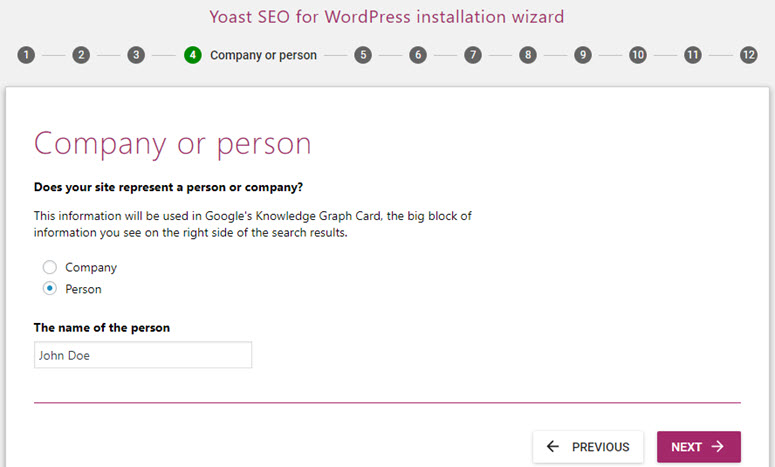
For Google’s knowledge graph card, you’ll be asked whether the site is run by a person or a brand. If Person is selected, you’ll have to specify the name of the person. If Company is selected, you’ll have to add the logo as well. Then, click Next.
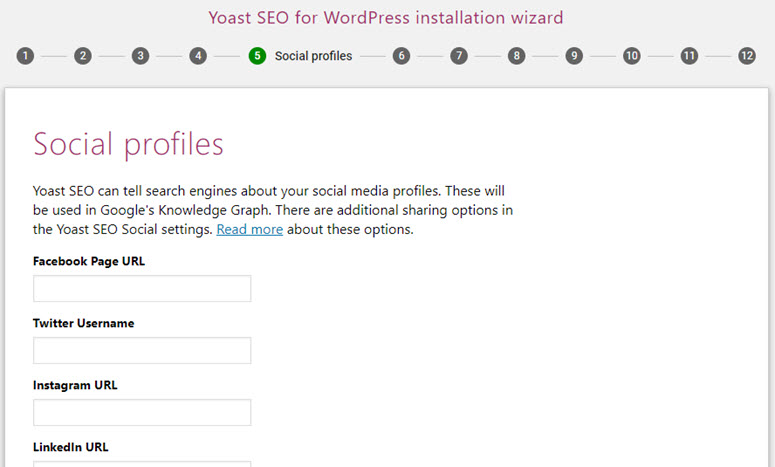
You can now enter your social media profile URL in its appropriate field. Then, click Next.
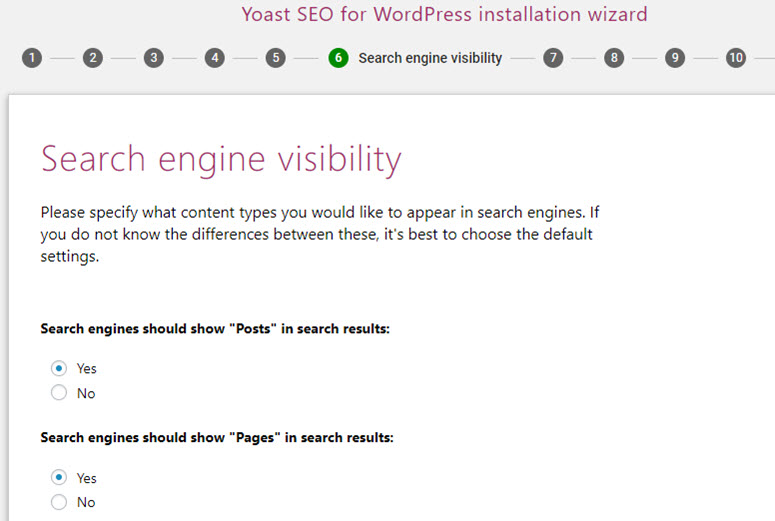
In the Search engine visibility step, you don’t have to change the default settings because they’re set up to index your posts and pages. Simply click Next.
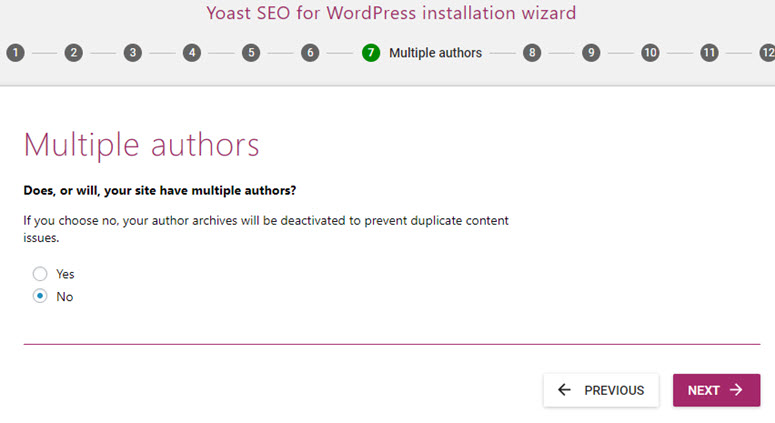
Author archives might create duplicate content issues for search engines. To prevent this, you can disable it if your blog doesn’t have multiple authors.
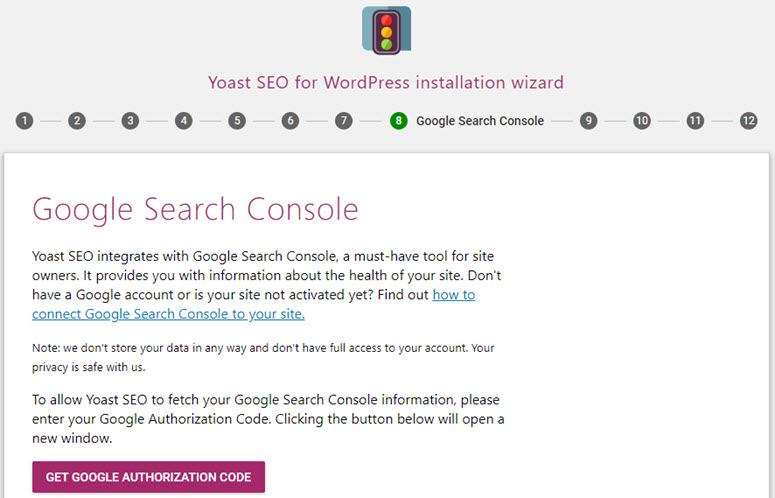
Next, you’ll be prompted to connect your website to Google Search Console, which is a free tool that gives you detailed insights into how your blog content is being perceived by Google.
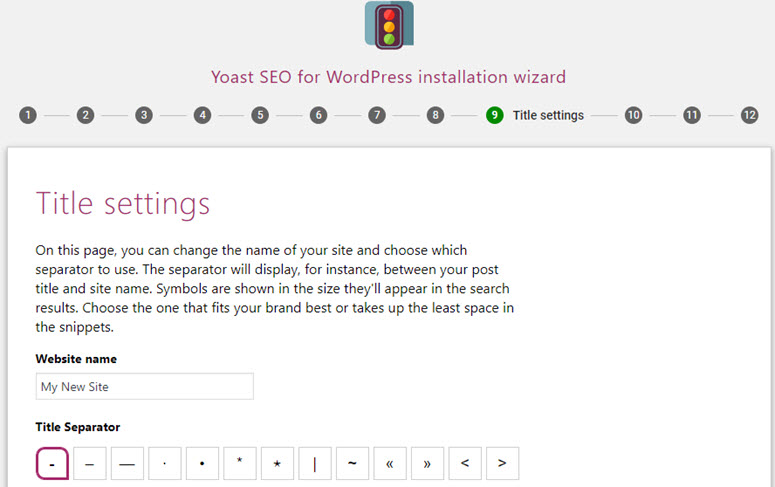
Next, you can set up the title for your blog, and then, click Next.
You can now exit the configuration wizard because other steps are created for promotional purposes only (such as signing up for Yoast’s newsletter).
Get started with Yoast SEO today to improve your blog’s SEO.
Want to start with the free version instead? Try the free Yoast SEO.
If you’re looking for some more recommended plugins for your website, then take a look below:
- Build contact forms with WPForms – Pro | Free
- Connect your site with Google Analytics using MonsterInsights – Pro | Free
- Improve your SEO with Yoast SEO – Pro | Free
- Add an extra layer of security with Sucuri
- Create regular backups with Updraft Plus – Pro | Free
- Improve WordPress performance with W3 Total Cache
- Prevent spam comments with Akismet – Pro | Free
- Grow your subscribers and sales with OptinMonster
↑ Go back to Table of Contents
« Previous: Chapter 5 – Configuring Your Website Settings
Chapter 7: Add Enhanced Features to Your Website (Advanced)
Depending on your needs, you might want to add enhanced features to your website. WordPress is extremely extensible, so all you have to do is to find the right plugin that allows you to add enhanced capabilities to your site without having to create it yourself or hire a professional developer.
Let’s take a look at how easy it is to add enhanced features to your WordPress website.
- Start blogging
- Add an eCommerce storefront
- Add a discussion board/forum
- Make your website available in multiple languages
7.1. Start Blogging
Adding a blog to your website is a great way to drive traffic to your new website and make it easier for users to discover you online. So, you’ll want to start a blog on your new WordPress website.
First, decide what you’ll blog about. The blog posts you write should match the goal of your website. For example, if you’re starting a small business website for your landscaping company, you could blog about lawn care tips for your customers. If you’re creating an online store, you could blog about gift recommendations to promote your products. Of course, if you’re starting a lifestyle blog, you’ll want to write about lifestyle topics.
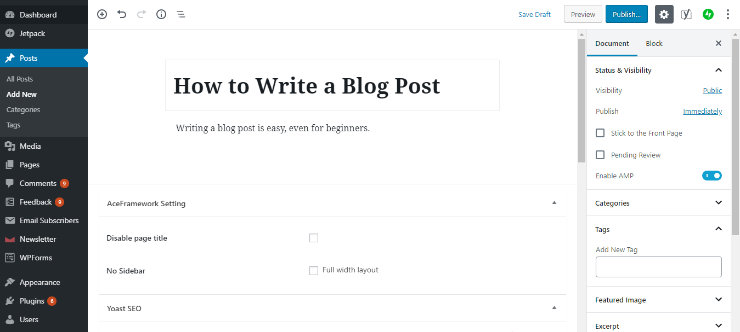
Step 1: Create a Blog Post
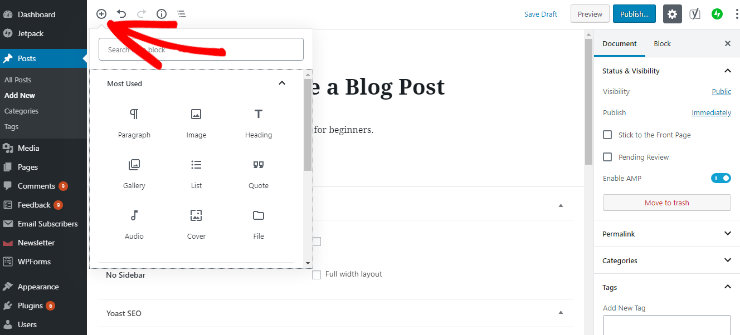
To create your first blog post, in the WordPress dashboard, click on Posts, and then Add New. This will take you to the WordPress editor where you can start writing your post. Simply type in the title of your blog post and start typing the body of the post underneath it.
In your blog posts, you can add blocks such as images, headings, audio, gallery, quotes, list, video, and more. To add a new block, click on the (+) icon in the top left corner. The most common blocks will appear first. Simply click the block you want to add within your blog post.
Step 2: Add Categories and Tags
When creating a blog post you’ll also want to add categories and tags. Categories and tags will keep the blog content on your website organized and make it easy for your site visitors to find what they’re looking for.
Categories are meant to be broad groupings. For instance, on a recipe blog, you might have broad categories such as Breakfast Recipes, Lunch Recipes, Dinner Recipes, and Dessert Recipes.
To add a category to your blog post, go to the gear panel on the right hand side. Under the Categories section, click Add New Category.
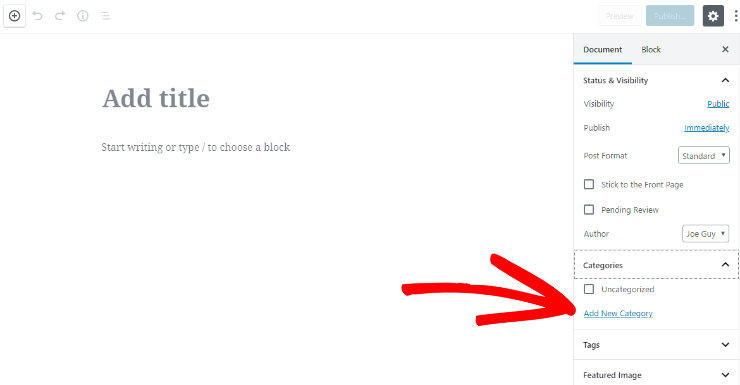
Name the category in the text field provided and click the Add New Category button underneath. Once your new category is created, it will appear with a blue checked box.
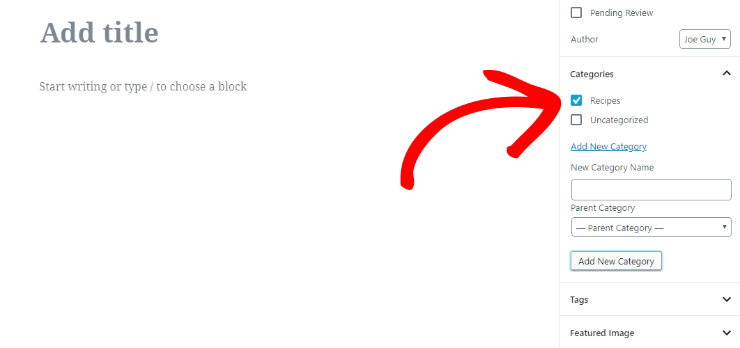
You can add as many categories and subcategories as you want.
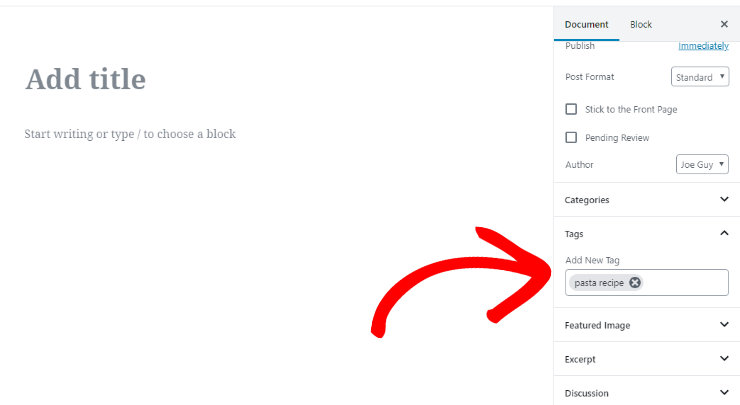
Tags are meant to describe specific details of your post and can be used to micro-categorize your posts. For instance, a blog post for a spaghetti recipe could be in the category “Dinner Recipes” and include tags like “spaghetti recipe” and “homemade pasta”.
To add a tag, go to the panel on the right side of the WordPress editor. Under the Tags section, type in your tag and press enter to add a tag to your post.
Once you’re finished writing your blog post and adding categories and tags, click the blue Publish button in the top right hand corner to make your blog post live on your website.
7.2. Add an eCommerce Storefront
The eCommerce industry is booming and the future of retail is eCommerce. With WordPress, adding an eCommerce storefront to your site is as easy as installing a plugin.
While you can find dozens of eCommerce plugins, WooCommerce beats the pants off all the competition and stays ahead of the curve with its unique features and ease of use.
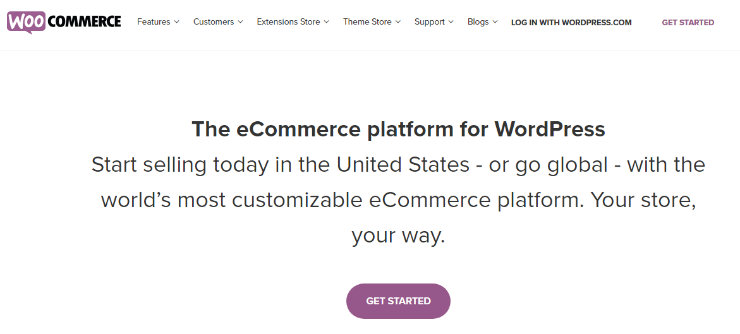
WooCommerce is the best eCommerce plugin for WordPress. It lets you easily integrate a storefront with your existing website and allows you to accept payments via PayPal. That said, it’s in your best interest to make sure that your WordPress theme is compatible with WooCommerce.
A few features of WooCommerce are:
- Allows you to easily sell physical or digital goods on your website.
- Easily add more payment gateways with addon plugins.
- Support tons of free and premium addon plugins to enhance your storefront.
- If you need to hire developers to add custom features to your site, it’s easy to find them because WooCommerce is the most popular eCommerce solution for WordPress.
Read the complete WooCommerce review for more information.
Looking to integrate an online storefront with your site? Get started with WooCommerce today.
7.3. Add a Discussion Board/Forum
Adding a discussion board or forum inside your WordPress-powered site is helpful to grow an engaged community. WordPress makes it easy to provide threaded discussion forums where your users can mingle and collaboratively work with a larger public.
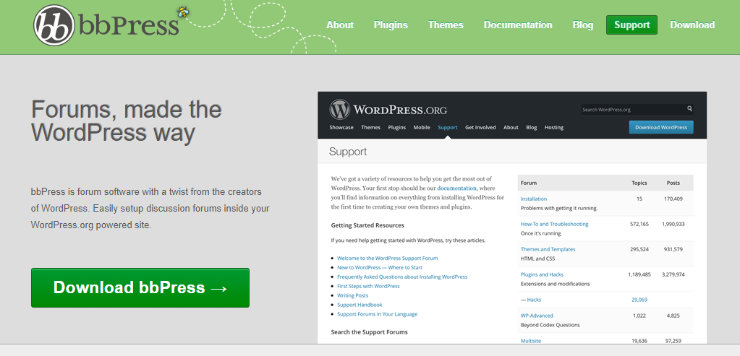
bbPress is one of the best WordPress forums plugins, and is created by the same folks behind WordPress.org.
Some of the cool benefits of powering your website with bbPress forums are:
- Hundreds of addon plugins are available that let you easily enhance your forum.
- Makes it easy to get your forums up and running with just a few clicks.
- Comes with a full set of features including extended profiles, group forums, notifications and activity logging, etc.
Read the complete bbPress review.
Looking to integrate a discussion board/forum with your site? Get started with bbPress today.
7.4. Make Your Website Available in Multiple Languages
Want to reach a wider audience by making your website available in multiple languages? Creating a multilingual website and reaching a global audience is easy with WordPress thanks to the different types of translation plugins available in the market.
With WordPress, you can find tons of different plugins that make it simple to create a multilingual website.
While some plugins focus on ease of use and enable you to easily create and manage your multilingual website, other plugins help you deliver automated translation based on users’ preferences. You can also find plugins that help you
connect with professional translators from within your WordPress dashboard.
To create a multilingual website with ease, we recommend using Polylang, one of the most popular WordPress translation plugins in the plugin directory.
With Polylang, you can use as many languages as you want, which is search engine friendly and is also compatible with the WooCommerce plugin.
Get started with Polylang today.
↑ Go back to Table of Contents
« Previous: Chapter 6 – Essential WordPress Plugins & Tutorials
Chapter 8: Promote and Grow Your Website

Before you start investing time and resources in promoting your site, it’s worth taking a moment to examine whether your website provides value to your visitors. No matter how much you spend on website promotion, your visitors won’t stick around unless it provides some kind of value.
For example, if your site is an online store, then you might want to publish useful videos demonstrating your products and how to use them. You can also offer huge discounts for first-time customers and bundled purchases.
Similarly, if you have a content website, then you might create pillar content that ranks well on Google so that it attracts new visitors and backlinks.
Once you’ve built a system on your website, like pillar content that provides some kind of value to your visitors, you can start investing your time and resources to drive traffic.
Keep in mind that without these systems your visitors won’t stick around, making your marketing efforts less effective.
8.1. Drive Traffic to Your Website
Traffic is the life of every website and, without it, your website will be worthless.
A few different ways to drive traffic to your blog are:
- Guest posting: Publish your guest articles in a popular blog and include a backlink to your site. Aside from driving traffic, it helps you demonstrate your expertise in your niche and establish yourself as an authority.
- Email outreach: Create a list of bloggers in your niche circles. Start an email outreach campaign to reach out to the bloggers and request them to provide a backlink to your site. With the right strategies, this tactic is effective in building backlinks and driving traffic.
- Search engine optimization (SEO): SEO enables you to grow your website traffic by getting your blog posts to rank higher in search engines. With onsite and offsite SEO tactics, you can drive more targeted organic traffic to your site.
- Social media: Encourage your readers to share your blog posts to social media. This can help you drive social media users to your site.
8.2. More Ways to Promote Your Website
Promotional strategies aren’t limited to driving instant traffic. If you’re only focused on short-term gains, chances are you’ll fall behind soon.
Wondering what promotional strategies you can rely upon for the long-term? Let’s take a look at some of them below.
1. Start an Email List:
One of the best ways to keep your visitors close with your brand or website is by creating an email list. In fact, it’s been found that 70% of first-time visitors will never return to your site once they leave. However, with an email list, you can build a connection with your visitors by regularly updating them on what’s been happening around your website and, ultimately, bring them back to your site.
You can sign up for a list building tool like Constant Contact, AWeber or MailChimp and start growing your email list by adding a signup box to your blog.
2. Exponentially Grow Your List:
Most default signup forms you create from email marketing services are boring. This makes lead generation less effective, which also significantly slows down the growth of your email list.
With OptinMonster, you can create beautiful optin forms with ease that are proven to drive more signups. It also comes with dozens of targeting options, so you can display the form to the right user in the right location of your site at the right time without frustrating them.
OptinMonster also helps you reduce cart abandonment with time-sensitive behavior based offers, which can be super helpful for online retailers.
3. Acquire Leads and Customers:
Investing in online ads is one of the best ways to acquire visitors, leads, and customers. Unlike traditional ads, online ads help you laser target your potential customers. Because of this, you can spend your advertising budget efficiently and drive more revenue through it.
Facebook ads: Facebook advertising is probably the easiest, yet effective enough to drive your targeted customers to your websites. It comes with tons of targeting options that enable you to display your ads to the right segment of Facebook audiences that are more likely to become your customers.
Google AdWords: When done right, Google AdWords is the most reliable advertising method that helps you generate more leads and customers for your online business. You can place your ads just above Google search results to attract visitors to your site and sell your products.
↑ Go back to Table of Contents
« Previous: Chapter 7 – Add Enhanced Features to Your Website
Chapter 9: Before-Launch Checklist
Making a website is serious business. Putting out your website for the world to see before it’s ready can impact your reputation and cost you future customers. So, before you launch your website, you need to make sure you’ve got everything in order.
To prevent you from launching your website before it’s ready, here’s a before-launch checklist you can follow. Check out the list below and before you make your website live, make sure you can check off each step.
- Build Your Website – Build your website and make sure you have all the important pages such as a home page, about, contact page, etc.
- Prep with a Coming Soon Page – Get your audience excited about your website before it’s even launched by adding a coming soon page to your site. You can easily do this using a WordPress coming soon plugin like SeedProd.
- Check for Errors – Check your website for little errors such as spelling mistakes. Make sure it’s easy to read by checking fonts and colors.
- Check Images – Check to make sure your images appear on your site, they’re optimized, and that they have alt text.
- Test Links – Test all of the links on your website to make sure they work and lead to the correct place. This includes your site navigation as well as any button links or links within content.
- Configure WordPress Settings – Configure WordPress settings like search engine visibility, permalink structure, comments and notifications, and timezone.
- Install Analytics – Create a Google Analytics account and use MonsterInsights to track your website data. Test to make sure it’s tracking accurately before launching your site.
- Test for Mobile – Make sure your website is mobile-friendly.
- Check Browser Compatibility – Make sure your site appears properly in all different browser types using a tool like BrowserShots.
- Test the Performance of Your Site – Test the speed and performance of your website to make sure it’s optimized for users. You can use our Free Website Speed Test Tool to test your site and get suggestions for improvements.
- Optimize Your Site for SEO – Install a plugin like Yoast SEO in order to optimize your website for SEO.
- Secure Your Site – Install a security plugin for your site like Sucuri. Be sure to use a backup plugin like Updraft Plus and prevent spam comments with Akismet.
After you’ve checked off each step in this before-launch checklist, it’s time to make your website live!
↑ Go back to Table of Contents
« Previous: Chapter 8 – Promote and Grow Your Website
Chapter 10: Useful Resources and FAQs
To be able to run a website and grow it on a WordPress platform, mastering and honing your WordPress skills are essential. While you don’t have to learn any programming languages, you should be able to fix some common technical issues yourself. It’s recommended to follow some of the top WordPress resources on the web.
Some of the best free WordPress resources you’ll find helpful are:
- IsItWP: At IsItWP, we regularly publish WordPress tutorials, WordPress theme and plugin reviews, product roundups, WordPress deals, and a lot more.
- WPBeginner: WPBeginner is the largest free WordPress resource on the web for WordPress beginners. On a regular basis, they publish useful WordPress tutorials, videos, deals for WordPress products, and a lot more.
- WPForms blog: Want to grow your online business using the WordPress platform? Then you need to follow the WPForms blog where can discover best practices and WordPress recommendations to build any types of WordPress online forms.
- MonsterInsights blog: The MonsterInsights’ blog is an excellent resource you can follow to get a handle on Google Analytics best practices and tips.
Having helped thousands of users start websites, we’ve found that people often ask the same questions again and again. This is why we’ve compiled a list of most frequently asked questions, so you can easily get your website up and running.
Can I create a website without WordPress?
Yes, there are a lot of different website builders out there that help you build a website. However, we always recommend you to start a website with WordPress because most free website builders display their ads on your free website, making it look unprofessional. They also don’t even allow you to choose a custom domain name for your site unless you subscribe to a premium plan. Also, if you violate any of their terms, they can shut down your website without warning.
On the other hand, with WordPress, you get full freedom over your site. Plus, you can add any additional functionalities without hiring a developer (like contact forms, an online store, etc).
Can I make a website on WordPress with no coding?
With WordPress, anyone can create a website without any technical knowledge. You can easily choose from tons of different WordPress themes that help you change your websites’ appearance. WordPress also has several drag & drop page builders like Beaver Builder and Divi that makes it super easy for you to create completely custom websites.
What’s the difference between WordPress.com and WordPress.org (self-hosted WordPress)?
WordPress.com is a free blogging platform that lets you kick start a website with ease. However, it comes with a lot of restrictions such as limited theme availability and limited storage space. Plus, the free platform doesn’t allow you to monetize your website with third-party vendors (like Google AdSense).
WordPress.org, also known as self-hosted WordPress, requires you to own a domain name and a hosting account to run a site. With a self-hosted platform, you get full control over your site, can monetize it the way you want, and it provides unlimited theme and customization options as well as unlimited storage space depending on your hosting provider.
How much does it cost to start a website?
To start a website on self-hosted WordPress, you’ll have to purchase a domain name for $14.99 per year and a hosting account, which costs around $7.99 per month. Altogether, starting a site will cost as low as $110.87 annually.
You can find thousands of free themes and plugins for your site. However, if you prefer premium themes and plugins, the running cost of your website may increase.
How to make a website mobile responsive?
Choosing a responsive theme for your website is the easiest way to make your website mobile responsive so that it works on any devices including desktops, mobile phones, and tablets.
How to make a website Google searchable?
If you want your potential users to discover your site on Google, then you’ll need to improve your SEO (search engine optimization). SEO is the practice of increasing your website traffic from search engines by getting your web pages to rank higher in search engine results.
Can I start a site anonymously?
If you want to publicize a site but remain anonymous, then make sure to protect your domain with WHOIS privacy turned on. For anonymous sites, people usually use a pseudonym/nickname to write under. You can even create a unique email just for managing the site.
How do websites make money?
There are a lot of different ways to monetize your website and make money through it. Some of them are:
- Advertising: Sell ad spaces to potential advertisers directly or through a third-party vendor like Google AdSense.
- Affiliate marketing: Promote products on your website and start generating revenue when your visitors purchase products through your affiliate links.
- Product sales: Add a storefront to your website and start selling your products to your site visitors.
- Sell services: Offer a service to your clients and generate revenue through it.
Can I add a blog to my website?
With WordPress, adding a blog to your website is easy. All you have to do is to create articles by navigating to Posts » Add New, and publish them by clicking the Publish button.
In addition, make sure to add a link to your blog in your navigation menu so your visitors can easily discover it.
Can a website be managed by many users?
Yes. WordPress comes with 5 default user roles by which you can manage the roles and permissions for every user of your site: administrator, editor, author, contributor, and subscriber.
What are categories and tags in WordPress?
The content of your WordPress blog is organized by categories and tags.
Categories are basically a broad grouping of your blog posts. Think of it as general topics you cover or a table of contents for your blog. Since categories are hierarchical, you can have as many subcategories as you like.
Tags are meant to describe specific details of your post. They can be used to micro-categorize your content, and they’re not hierarchical. Think of these as the index part of a book.
How can I learn more about WordPress terminologies?
Refer to this WordPress Glossary Terms for Beginners whenever you’re puzzled by strange WordPress terms or abbreviations.
How do I make my website faster?
Choosing a reliable web host like Bluehost is one of the recommended ways to make your website faster. Some other methods are:
- Reduce the images you use on a single page or lazy load them if you want to use a lot of them in a single page.
- Boost your site’s performance using a cache plugin, like W3 Total Cache.
- Use a Content Delivery Network (CDN).
How do I make my website secure?
To make your website secured, it’s advised to back up it on a regular basis and use a security plugin, like Sucuri so you can scan it and fix any issues as they’re found.
We hope this guide helped you learn how to start a WordPress website without hiring a developer.
If you enjoyed this article, check out our article on how to create an online store.
Haw can I earn money through my blog?
You can check it out here if you want to learn more about making money: 30 legit ways to make money
This is by far the best content for a beginner out to make a website. Compliments!
Thank you, Amit!
HELLO, I WANT TO DESIGN A WEB SITE, I NEED YOUR HELP
Step one: learn where the cap lock key is.