
Do you want to create a professional branded business email with G Suite?
Setting up a professional business email address is one of the first things you need to do after building a website. A professional email address gives your business a sense of credibility and makes your customers feel that you’re here to stay and serious about your business.
G Suite, also known as Gmail for business, is a product by Google for creating professional business emails. Formerly known as ‘Google Apps for Work’, G Suite provides a host of features and options to brand your website by setting up business emails.
In this article, we will show you how to create professional branded business emails with G Suite in 3 easy-to-follow steps.
What Is a Professional Business Email?
A professional business email displays the domain name of your company after ‘@’ instead of gmail.com, yahoo.com, or the domain name of any other email service providers. For example, john@isitwp.com is a professional email while john.isitwpblog@gmail.com is a generic, unprofessional one.
Below are a few reasons why you need to set up a professional business email:
1. It Represents Your Brand:
A business email represents your brand by displaying your domain name in the email address.
2. It Builds Trust Among Your Customers:
People tend to trust professional email addresses when it comes to business emails. Professional emails are able to offer professional vibes while personal emails are not.
It gives a sense of credibility and trust to your business.
3. Ease of Email Management:
Another benefit is that you can easily set up and manage the email addresses of your team members. When a team member resigns, then you can retire their email address and forward it to another email address.
Using Business Emails – Your Hosting Provider vs. G Suite
If you have already set up a website, your hosting company may have offered you unlimited professional emails. Yes, most of the hosting companies include business email accounts, but they are not reliable.
You can even set up free business emails with your web hosting account.
However, web hosting email servers lack the features required in a dedicated email service provider like secure and instant message delivery, storage, anytime tech support, spam filters, ad-free emails, etc. That’s why you need to use G Suite for professional business emails.
G Suite, in other words, is a paid email service from Google or premium Gmail, thus there is absolutely no doubt about its reliability. It includes all the basic Gmail features and more additional Google apps created for business purposes.
Benefits of Using G Suite for Business Emails
G Suite has a host of advantages which are stated below in points:
- Build professional branded business emails with your company / domain name
- Access your email anytime, anywhere, and on any device without an internet connection. Read and draft messages without using the internet.
- Sign in once and use all the Google apps on a device.
- Use a host of free and premium business apps including Drive, Shared Calendar, Hangouts Chat and Meet, Docs etc. – connect, create and share files and information easily within the team
- Manage all the email accounts used by everyone in the company – secure your company resources and private information even after a team member leaves the company.
- Work with peace of mind because Google manages the security – 99.9% guaranteed uptime, automatic backups, spam filters etc.
- Adequate storage capacity – 30GB storage with the minimal ‘Basic’ plan
- Advertisement-free email service
- Works well with Outlook and other email services – G Suite Sync for Microsoft Outlook, and migration tools for importing emails
- Enjoy 24/7 technical support by phone, email, or online
You’d also like to check out our article on best business phone services and systems.
With all these benefits assured, G Suite is a great platform to create professional business emails. Now, let’s see how to set up a professional email address for your business.
How to Start a Professional Email With G Suite in 3 Steps
First, visit G Suite’s website to start the setup process.

Next, you can simply click on the ‘Get Started’ button to start the process but let’s discuss a little about pricing first.
You can click on the ‘Pricing’ menu to learn about the G Suite Pricing plans. It has three editions named ‘Basic’, ‘Business’, and ‘Enterprise’ with different level of features aimed at different types of users.
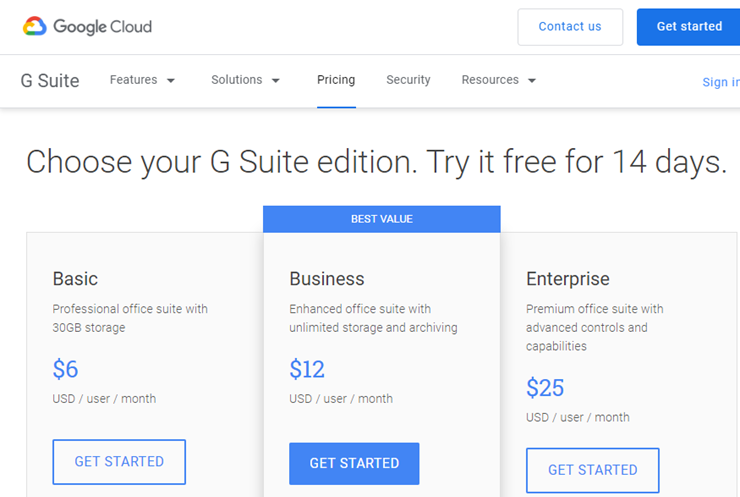
The cheapest and most basic plan, ‘Basic,’ costs $6 per user per month. It provides 30GB storage per user which is double that of a free Gmail account. Moreover, it allows video and voice conferencing, secure team messaging, shared calendars, and options to create documents, spreadsheets, and presentations. Most noteworthy, you get 24/7 tech support, security, and administrative controls in hand.
For more details about pricing plans, please visit G Suite’s website.
Now, after you have reviewed the pricing options, you can click on ‘Get Started’ button and the first step starts.
G Suite’s setup process has three main steps. Let’s take a look at them one-by-one below.
Step 1: Set Up a Professional Email Account
First off, you have to set up a business account. This account enables you to create and manage professional email accounts for your entire team.
G Suite offers 14-day free trial to test drive the service. You get 14 days to get familiarized with the platform and test its features before you spend your hard-earned dollars.
Get Started
After you click on ‘Get Started’ button, this is the first page that appears. See the screenshot below.

Fill out your business name, choose the number of employees, and select the country you are located in. Then, click ‘Next’.
Now, you will be asked to fill out your contact info in this next step. Fill out your first name, last name, and current email address, and click ‘Next’.
Now, it will show a page like the one shown below.

Here, you have to choose ‘Yes, I have one I can use’ if you already own a domain name. If you don’t have one, you can select ‘No, I need one’ and this will take you to a domain purchasing interface. We have chosen the first option for this tutorial.
Enter Your Business Domain Name
Now, you will see a page where you are required to enter your business’ domain name.

Please fill out this form carefully with your domain name because this will be used in your business email. For the sake of this example, we’ve used our domain name as ‘yoursitename.com’. Now, the emails will look like ‘john@yoursitename.com’. After you enter your domain name, click Next.
Then, you will be asked to confirm your domain name. Check it and click ‘Next’.
You’ll also be asked whether you want occasional emails with tips, offers etc. from Google. You can choose either ‘Ok’ or ‘No, thanks’.
Set Up G Suite Sign In Details
Next, you can see the final signin page on the window as shown below.

You can see how you will sign in. Your custom domain name is now prepared for email domain. Enter your username, create a password, check reCAPTCHA, and click on ‘Agree and Create Account’.
Now, you will see a message ‘Your G Suite account has been created’ on the screen. Click on Go to Setup for the next step.
Step 2: Adding Email Accounts for Your Team Members
In this step, you will add email accounts for your team members. Click on Start.

Then, you can see a page where you can create email accounts for your team.

Enter the first name, last name, and username for each of your team members and add them. After you’ve added emails for everyone on the team, check the box for confirmation and click on ‘Next’.
And, you are done with the second step.
Step 3: Verify Your Domain
Now, you need to verify your domain to prove you possess it. This is important because this ensures that only the actual domain owner can create a professional business email with that domain name.
Domain verification takes 5 additional steps, as explained below.
1. Add Meta Tag
The first step for domain verification is adding a meta tag to your domain name. You need to add Google’s verification meta tag in the header section of your homepage.

In order to add this easily, you can use the Insert Headers and Footers plugin.
Log into your WordPress dashboard and install the plugin. After activating the plugin, go to Settings » Insert Headers and Footers option.
Now, you can copy the meta tag and paste it into the header section and save it.

Return to the G Suite setup page and check the box ‘I added the meta tag to my homepage’.
2. Open the Control Panel for Your Domain
Then, you are required to open the control panel for your domain name.

So, log into your hosting account (cPanel dashboard) and check the box ‘I have opened the control panel for my domain.’
3. Delete Existing MX records
Next, you will see a box like the one pictured below.

Go to the emails section in your cPanel and select the MX entry icon. Next, choose your domain name. Then, you can see a list of options including 5 MX records. Delete those MX records one-by-one.

After you delete them, return to your G Suite setup page and check the box I have deleted existing MX records.
4. Create New MX Records
Now, you will see a new box as in the image below.

In order to create new MX records, go to the ‘MX Entry’ icon in the email section of your cPanel dashboard. Now, add the new MX records given to you by Google one-by-one.

After you have added them all, return to your G Suite page and check the box I created the new MX records.
5. Save the MX Records
After adding your MX records, make sure that you save them. Then, check ‘I saved the MX records’.
This is the final step of verification. After you have all 5 steps checked, you can click on Verify Domain and Set Up Email.

Now, the G Suite setup wizard will start verifying your domain and setting up email. It may take a few minutes.

After the verification is complete, you can see a message stating that your domain verification and email setup is complete.
Click the Next button to open your new business email created with G Suite. You may need to re-confirm your current email address to open this new business email.
Then G Suite admin console sign-in page appears.

The Admin console is where you will manage the G Suite account, email addresses, G Suite apps, and more.
That’s it!
We hope this article helped you create a business email address with G Suite.
You can use your G Suite professional email simply just as you use a free personal Gmail account. Go to Gmail, sign in and start using it.
Well, you need a website first before creating a professional business email. If you have not built a website for your business yet, here is how to make a website (step-by-step). You should also check out how to create an email blast the right way.

Comments Leave a Reply