Do you want to add an optin form on your website? An optin form is helpful to get more user subscriptions and it allows you to further engage your visitors. Once you have the right tools, you can implement a strategy to reach out to your users and get their email addresses. In this article, we’ll show you how to easily create an optin form on your WordPress site.
What is an Optin Form?
An optin form is a user subscription and email marketing form. You can increase your website subscribers easily using an interactive optin form. These subscribers can later become your customers.
You can create a stunning optin form for your visitors, so they feel free to sign up to your email newsletter and become a part of your mailing list, once you implement the right tools.
We’ll walk you through 2 different methods to create an optin form on your WordPress site.
Method #1 – Using OptinMonster:
Best suited for users who want to create stunning, conversion-optimized forms. OptinMonster is a standalone platform, meaning you can create an optin form on any site, including WordPress, Shopify, Joomla, HTML site, etc.
Method #2 – Using WPForms:
Choose WPForms if you want a WordPress plugin to create an optin form. The benefit is that you can build as many as optin forms right within your WordPress dashboard.
Ready? Let’s get started!
Method 1: Create an Optin Form in WordPress using OptinMonster
First, we will be using OptinMonster plugin.
OptinMonster is the best WordPress lead generation plugin. It’s the most powerful, most flexible, plugin available and is used to easily create optin campaigns for your visitors. OptinMonster has tons of amazing features to increase your subscribers.
Also, check out our article on best WordPress popup plugins featuring OptinMonster.
Before we start, you’ll need to install and activate the OptinMonster plugin. For more details, you can see our step-by-step guide on how to install a plugin in WordPress.
Upon activation, you’ll need to go to the OptinMonster menu in your WordPress admin area to enter an API key.
To get your API key, you’ll need to go to your account on OptinMonster’s website and visit the API page from the top menu.
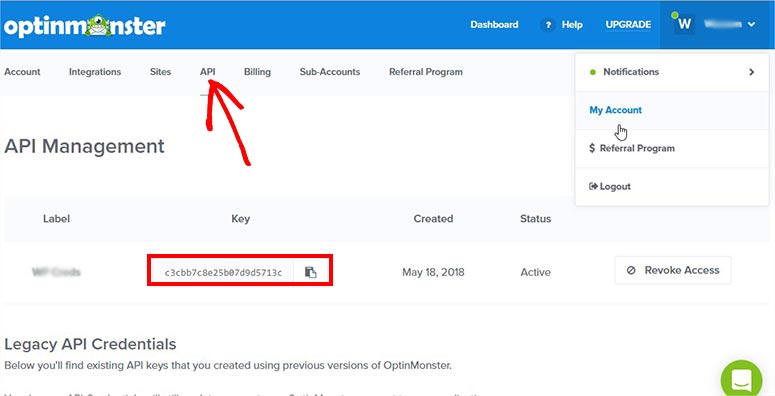
Copy and paste this API key to the OptinMonster page on your WordPress Admin account.
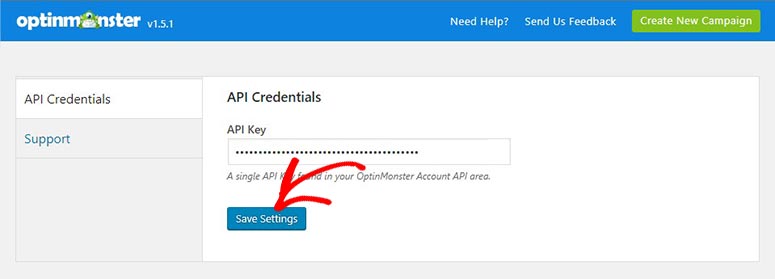
Click on the Save Settings button to continue.
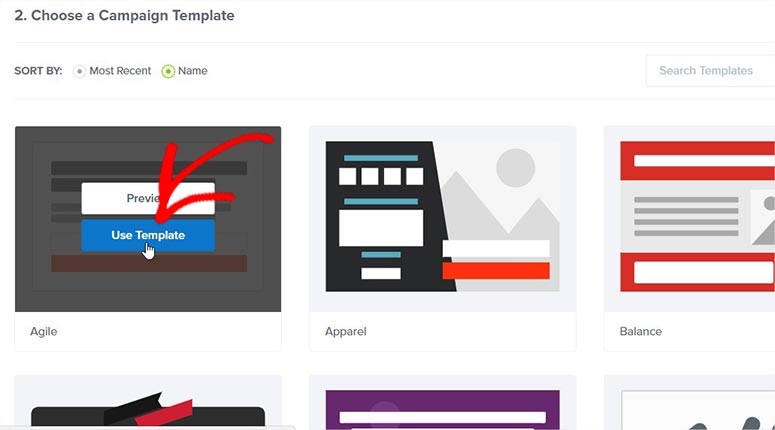
After that, you’ll need to click on the Create New Campaign button on top right-hand corner of your screen. It’ll launch the OptinMonster campaign creation page in a new window.
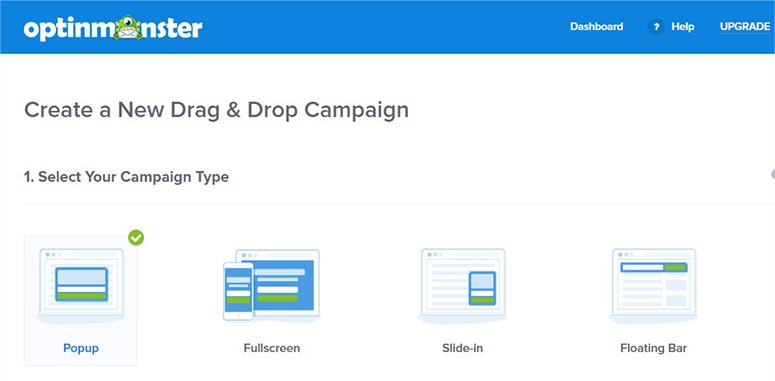
You’ll need to select a campaign type in order to get started. Since we’re creating a simple optin form, let’s select a Popup campaign and scroll down to choose a template.
Note: You can also create an optin form using other campaigns types easily. We chose a popup for this tutorial because it’s the most popular option.
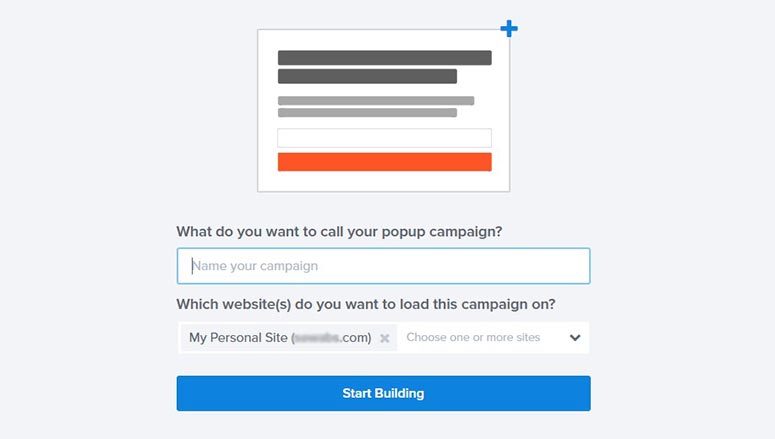
It’ll ask you to add a name for your optin form campaign and select the website where you want to display it. Add this information and click on the Start Building button.
Next, you’ll see the design page to set up your optin form.
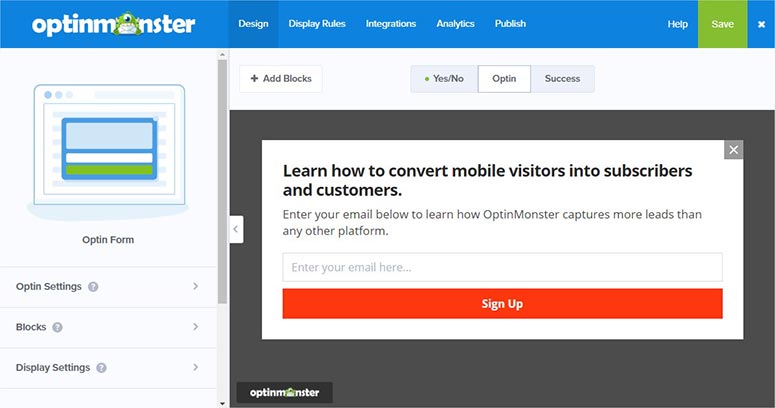
On this page, you can go to Optin Settings from the left-hand menu to manage basic settings like optin view styles, close button, and custom CSS.
In the Blocks settings, you’ll have the option to add more blocks to your optin form. The drag and drop functionality in the OptinMonster makes it simple for you to add blocks effortlessly. With these blocks, you can add text, images, fields, etc.
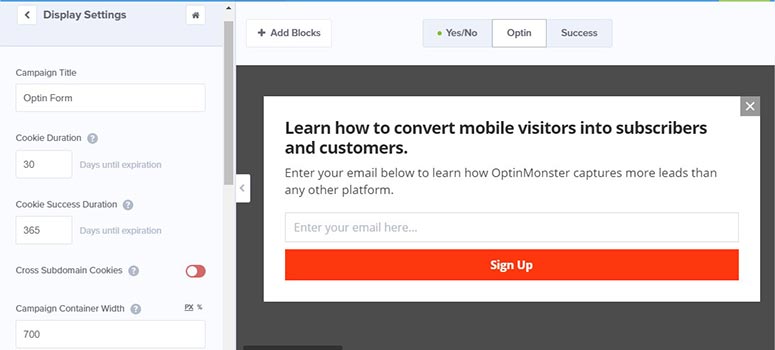
You can go to the Display settings to manage the display and form duration options. It allows you to modify your campaign name, add cookie duration, set the container width, and more.
You can also set up the success message for your new subscribers. This success message will appear after the users fill the optin form on your website. Simply shift to the Success tab from the top of the form preview.
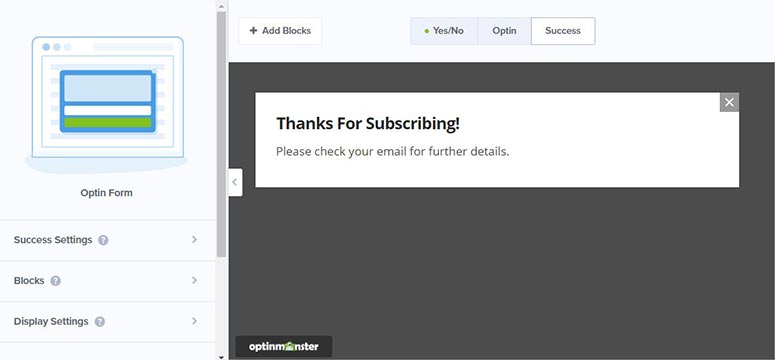
In the Success Settings, you can manage success view styles, close button settings, and add custom CSS. Furthermore, the success view styles settings allow you to add an image on the success message, change the font style, customize the colors, and more.
For all the settings, you’ll have a preview on the right-hand side, so you’ll know exactly how the optin form will appear on your website once it’s live.
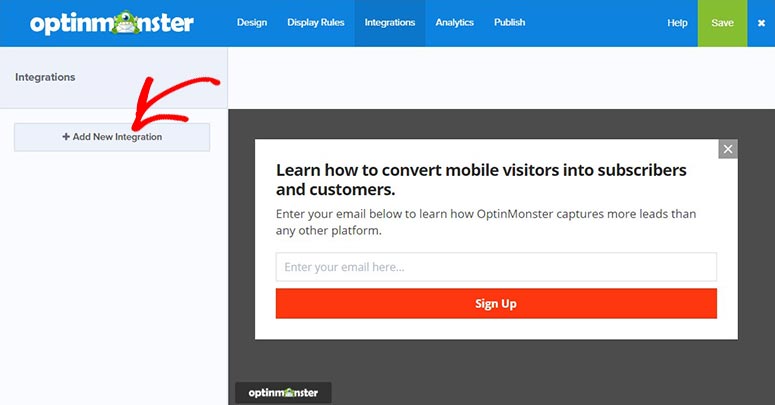
Next, you’ll need to add an integration that’ll collect the email addresses from your visitors. Go to the Integrations tab from top of the page and click on the Add New Integration button.
OptinMonster includes many integrations for the top email service providers like AWeber, MailChimp, Constant Contact, SendInBlue, and more.
You can select an email provider like AWeber and connect OptinMonster with AWeber to continue.
Once you’re satisfied with the settings for your optin form, click on the Save button in the top right corner of the screen.
The best part of creating an optin form using OptinMonster is you’ll get everything at your fingertips. After saving the settings, you can go ahead and click the Publish button.
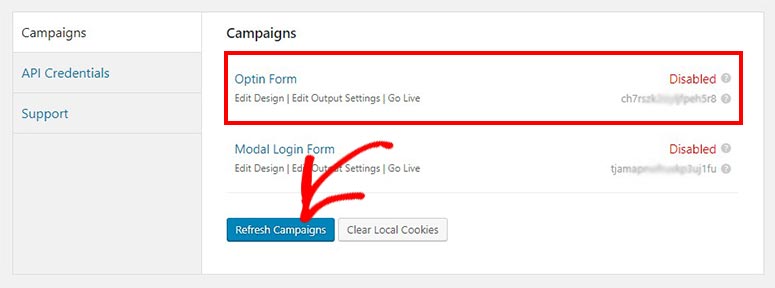
Now, go back to the OptinMonster page in your WordPress Admin area and click on the Campaigns button.
Note: If you don’t find your optin form there, then click on the Refresh Campaigns button.
Click on the Edit Output Settings link below the name of your optin form campaign you created and enable the campaign on site option. You can also control on who should see this optin form.

Save the settings to see your optin form in action.
You can always edit the design and text of your optin form. OptinMonster is fully flexible and allows you to add more features to the optin campaigns you’ve already created, so you can increase your email subscribers unbelievably quickly.
You’d also want to check out this comparison between OptinMonster vs Sumo to find out the winner among them.
If you’re looking for an alternative method, then continue reading below to use WPForms to create an optin form on your WordPress site.
Method 2: Create an Optin Form in WordPress Using WPForms
WPForms is the best WordPress form plugin on the market. It allows you to easily add custom forms onto your site, including an optin form.
The first thing you’ll need to do is to install and activate the WPForms plugin. For more details, see our step-by-step guide on how to install a WordPress plugin.
Upon activation, you’ll need to verify your license key to get instant access to all of WPForms features and addons.
To get your license key, you’ll need to login to your WPForms’ account.
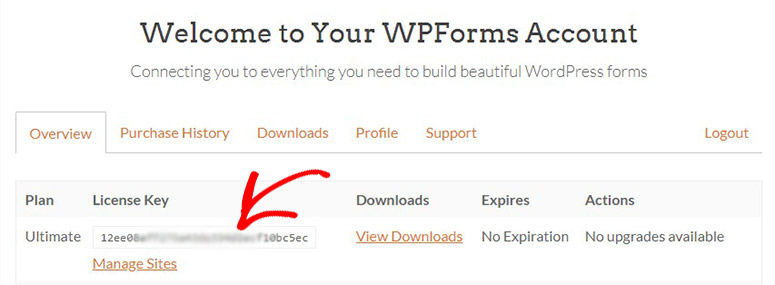
Copy and paste this license key to your WordPress Admin area on the WPForms » Settings page. Now, click on the Verify button.

Once verified, you’ll need to go to the Integrations tab on the WPForms settings page. On this page, you’ll find the Constant Contact email provider.
The email provider will help you store the emails of your subscribers. It also allows you to create your email lists, contact your subscribers, and more.
Note: You can also integrate your form with other email providers like AWeber, MailChimp, GetResponse, etc. All these options are available as addons on the WPForms » Addons page.
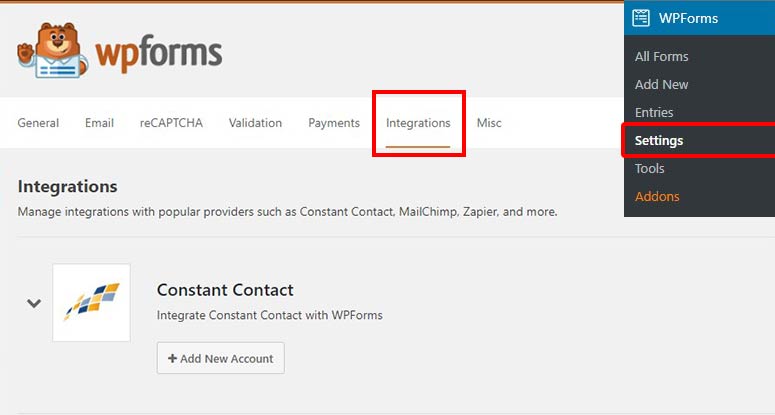
You’ll need to add a new account with Constant Contact to integrate this service with your optin form. Simply follow our step-by-step guide on how to connect Constant Contact with WPForms.
After that, you’ll need to go to WPForms » Add New from your WordPress Admin area to launch the WPForms builder.
Add a title for your new form and click on the Newsletter Signup Form template.
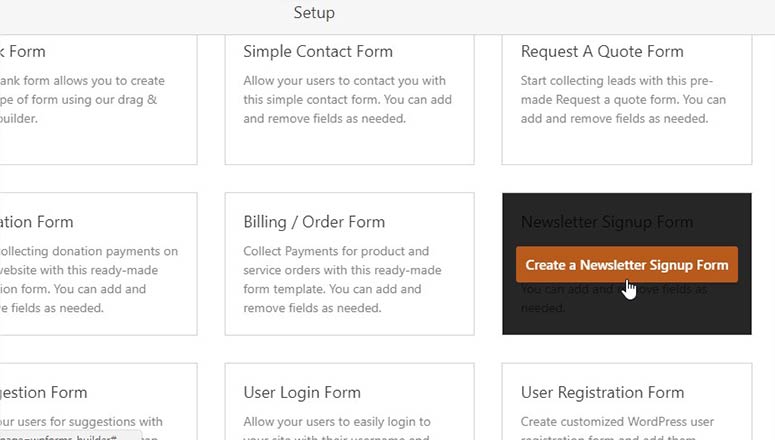
It’ll load a ready-made newsletter signup form.
Now, you’ll need to connect this form with the Constant Contact email provider to store the emails. For that, you’ll need to go to the Marketing tab on the left-hand side and click on the Constant Contact option to connect your form with it.
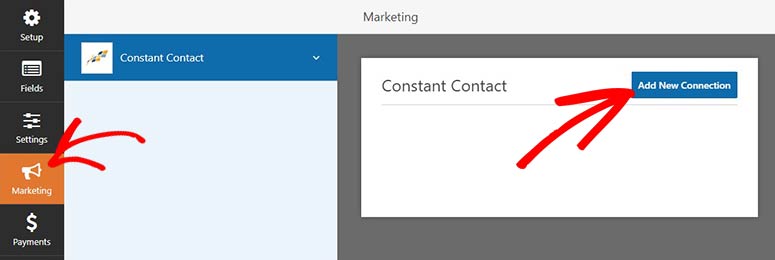
You’ll need to click on the Add New Connection button to create a connection. Name your connection and you’re ready to connect additional fields to your optin form.
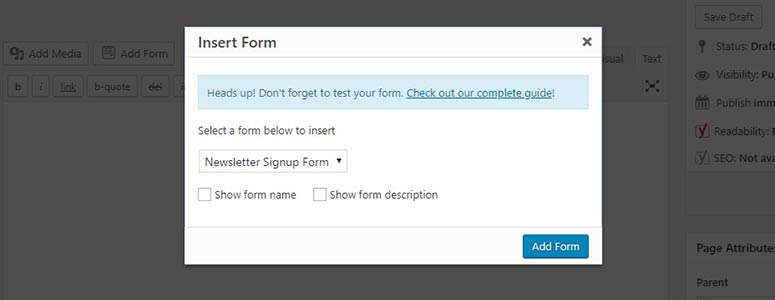
Save the form and exit. Finally, you’ll need to display this form on your WordPress site.
Simply go to Pages/Posts » Add New in your WordPress Admin area and click on the Add Form button above the text editor. It’ll open a popup where you can select your optin form and click on the Add Form button to insert it in your page/post.
You can also display the optin form in your widget-ready areas, like your sidebar, using the WPForms widget.
That’s all!
We hope this post helped you learn how to create an optin form on your WordPress site. You may also want to check out our guide on how to create a custom user registration form in WordPress.

Really very nice explanation. Screen shots were not shown for WPForms set up procedure.However,easy to follow.
Optin monster, WP Forms and Constant Contact are free or paid Tools?
Constant Contact and OptinMonster are paid tools. WPForms also has a free version on WordPress.org